Custom Analysis
Platform Introduction
This platform achieves deep integration between visual analysis workflows and the Jupyter. In addition to providing standardized cloud analysis reports, we have created a configuration-free, ready-to-use Jupyter cloud workbench.
The environment comes pre-installed with dozens of mainstream single-cell and spatial omics analysis tools such as Scanpy, Seurat, Monocle3, CellChat, and more (supporting both Python and R). You can perform deep personalized data mining and custom plotting directly on cloud platform data without setting up complex local environments.
TIP
Note: This feature is an extra paid value-added service and requires separate purchase to activate.
How to Access the Jupyter
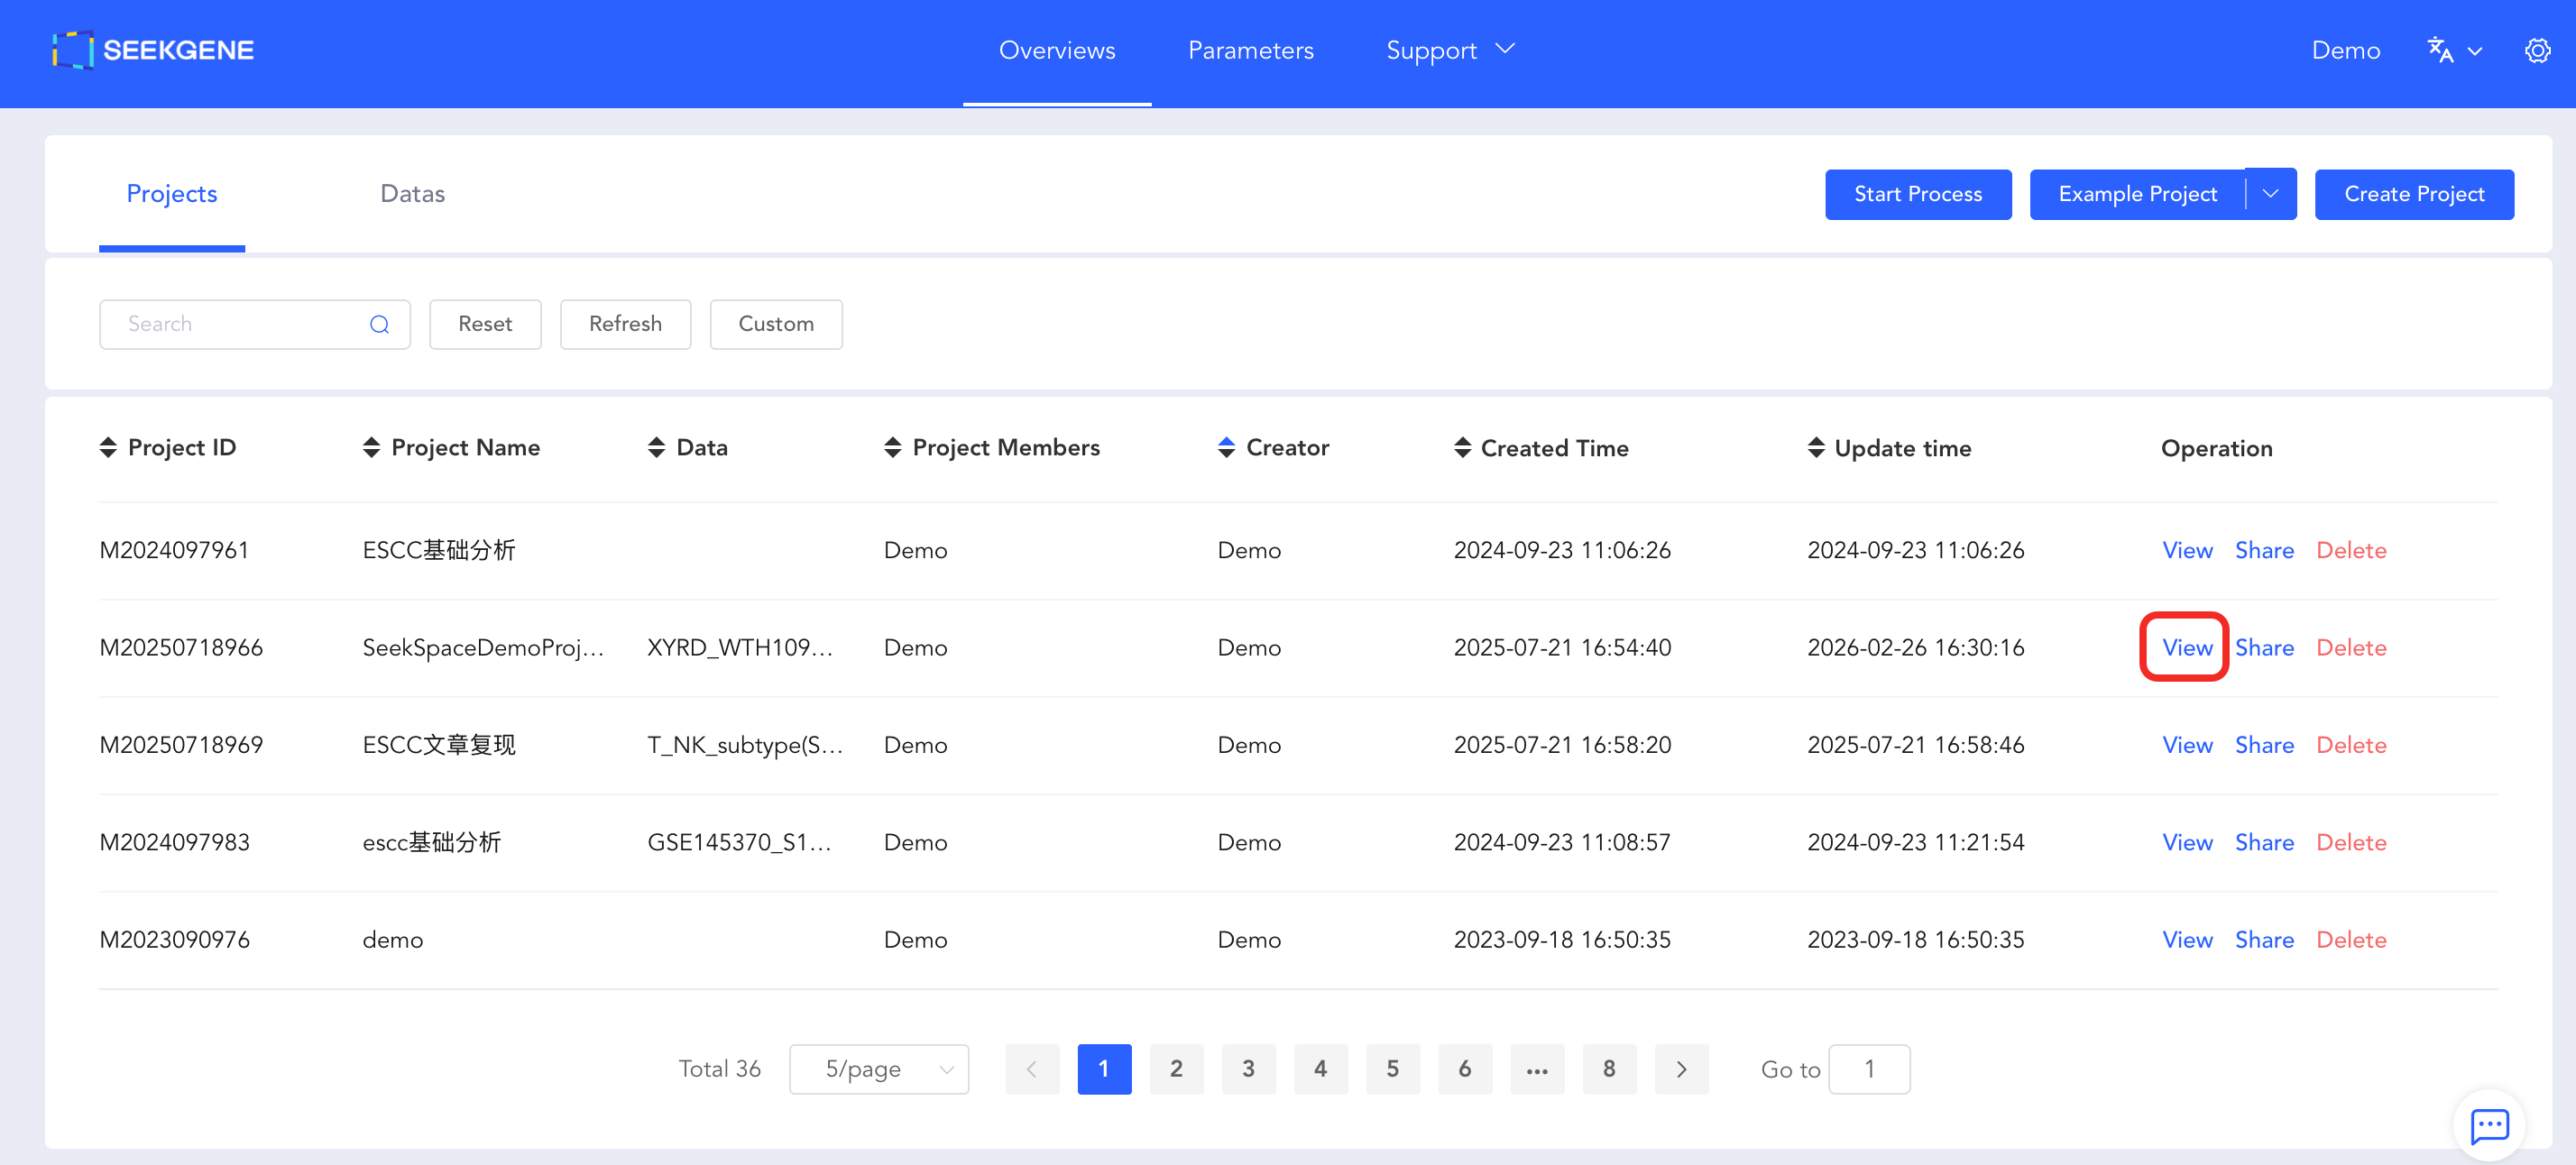
- Enter Project Details: Log in to the cloud platform, navigate to Overview -> Projects -> View, and enter the project details page.
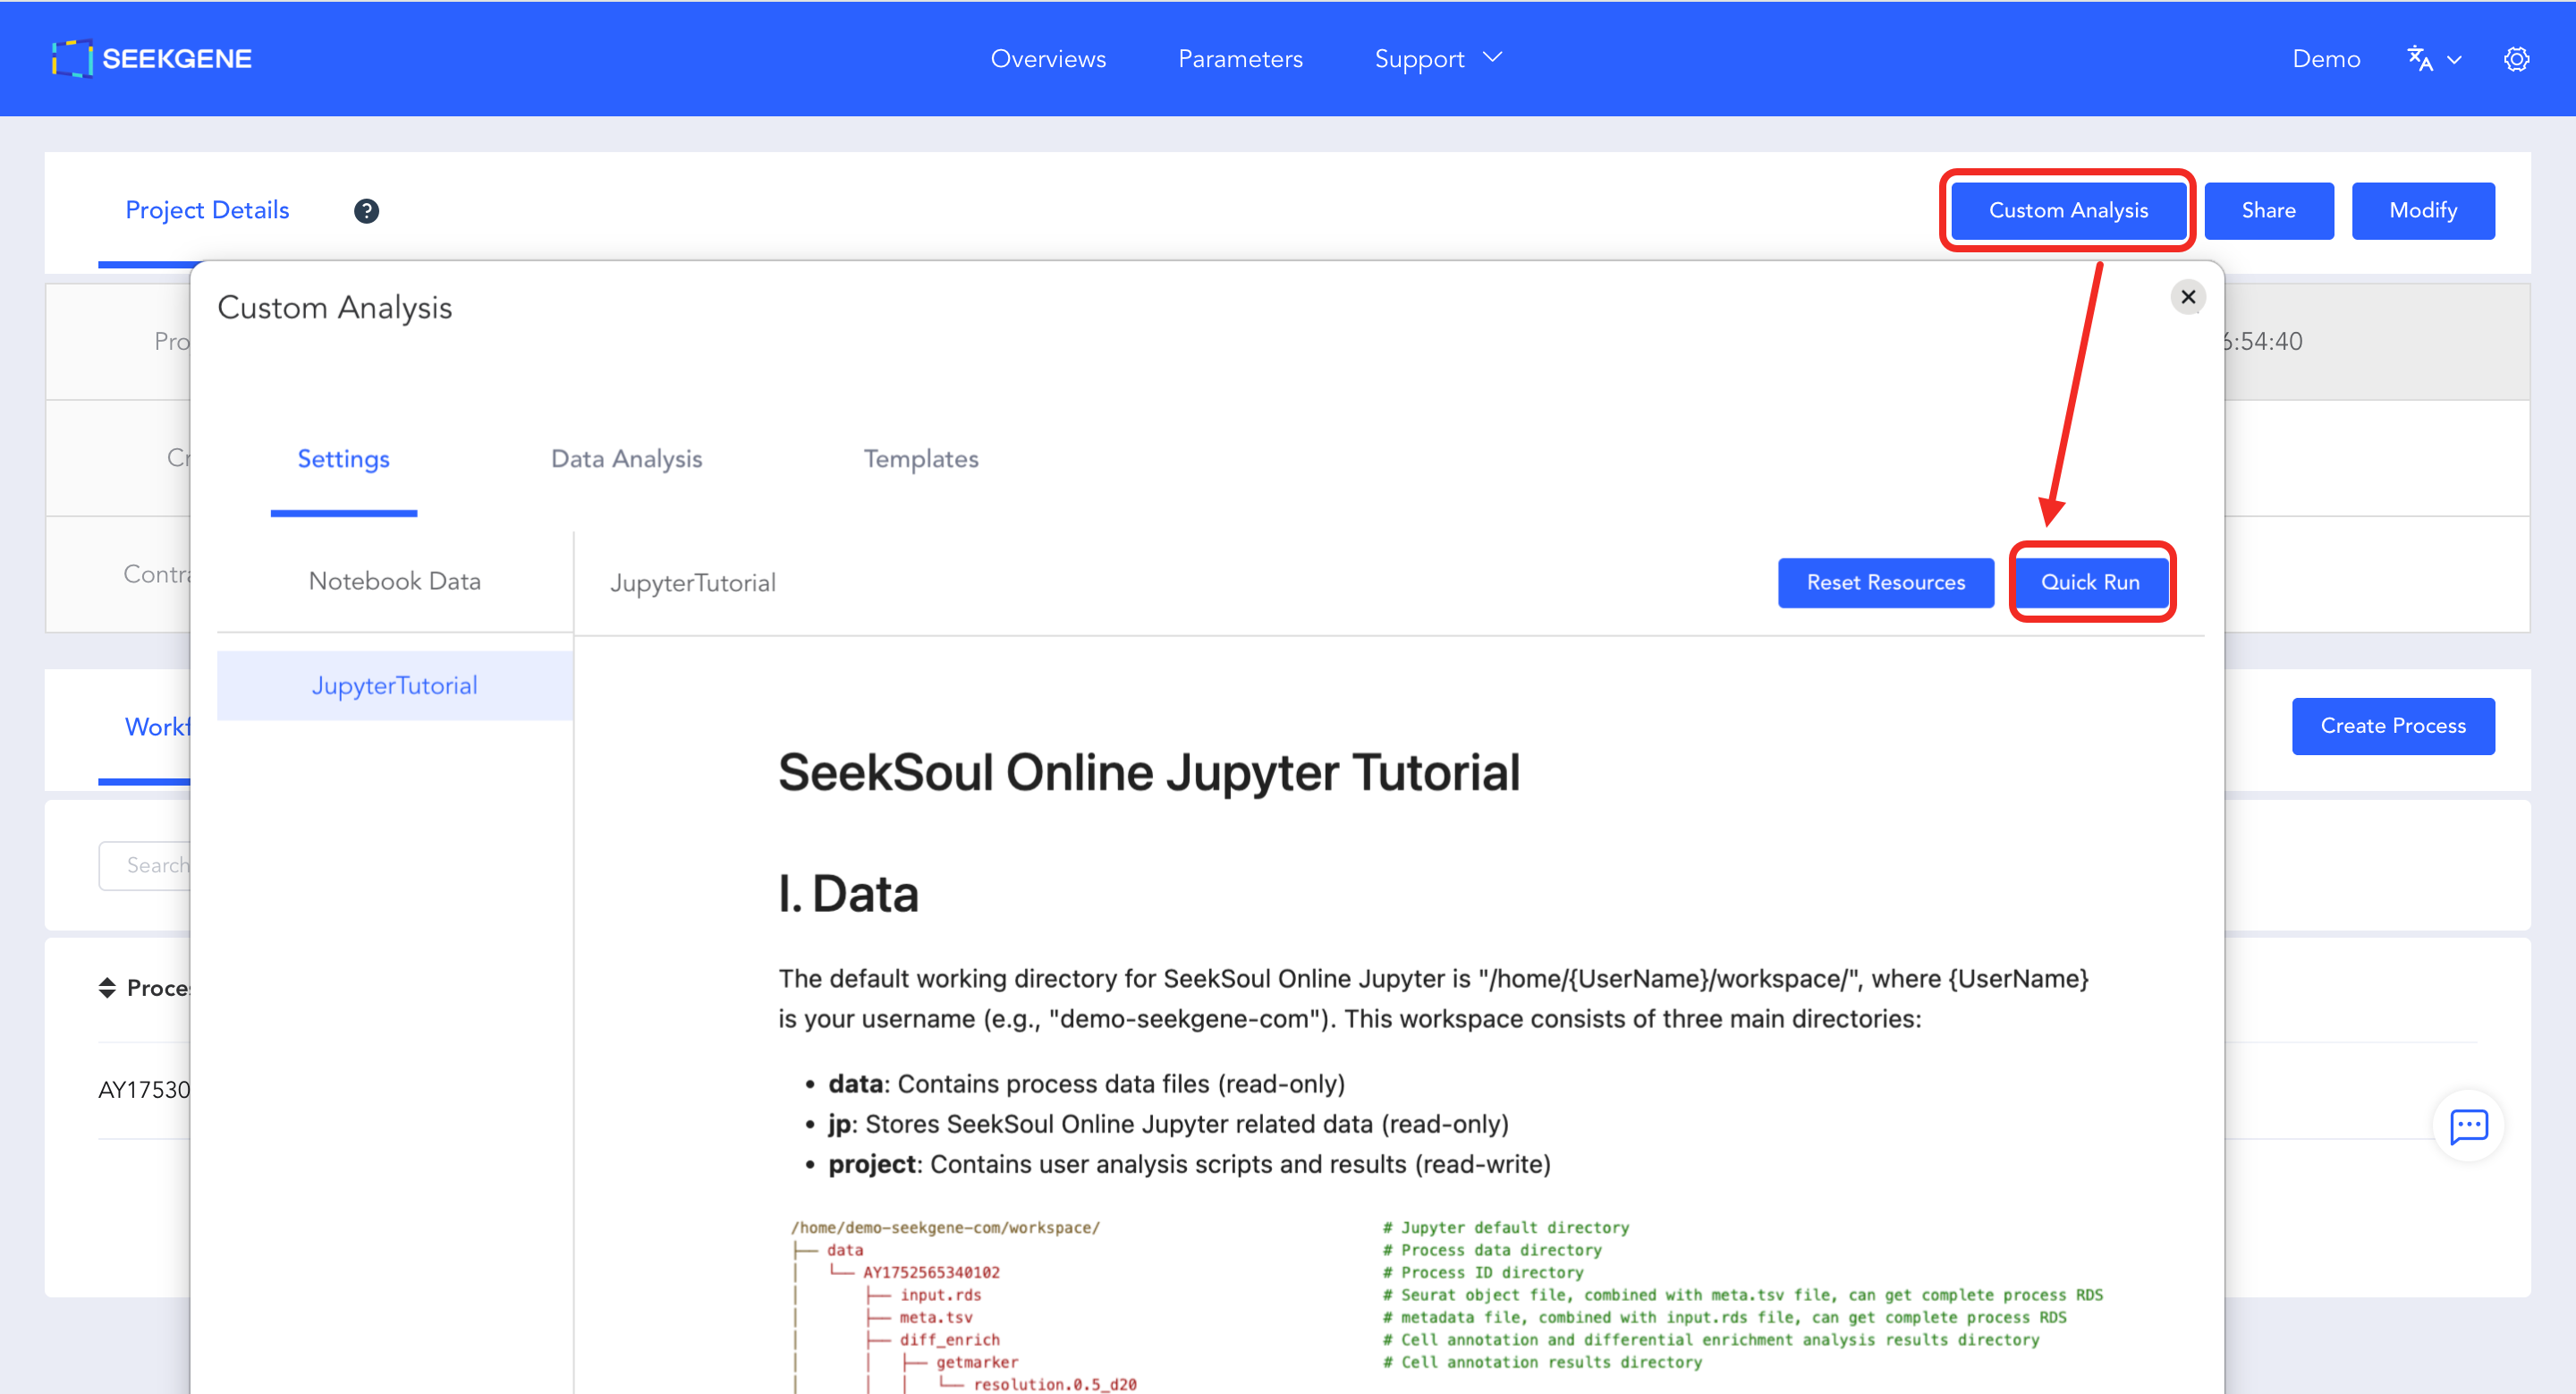
- Launch Configuration Page: Click the blue "Custom Analysis" button in the top right corner of the page to enter the configuration page.
- Start Environment: Click the blue "Quick Run" button in the top right corner of the configuration page. The system will automatically allocate computing resources and start the Jupyter environment, redirecting you directly to the operation interface.
Platform Data Directory Structure
The default working path for Jupyter is /home/{UserName}/workspace/ ({UserName} is your username). This directory contains three core folders with the following purposes:
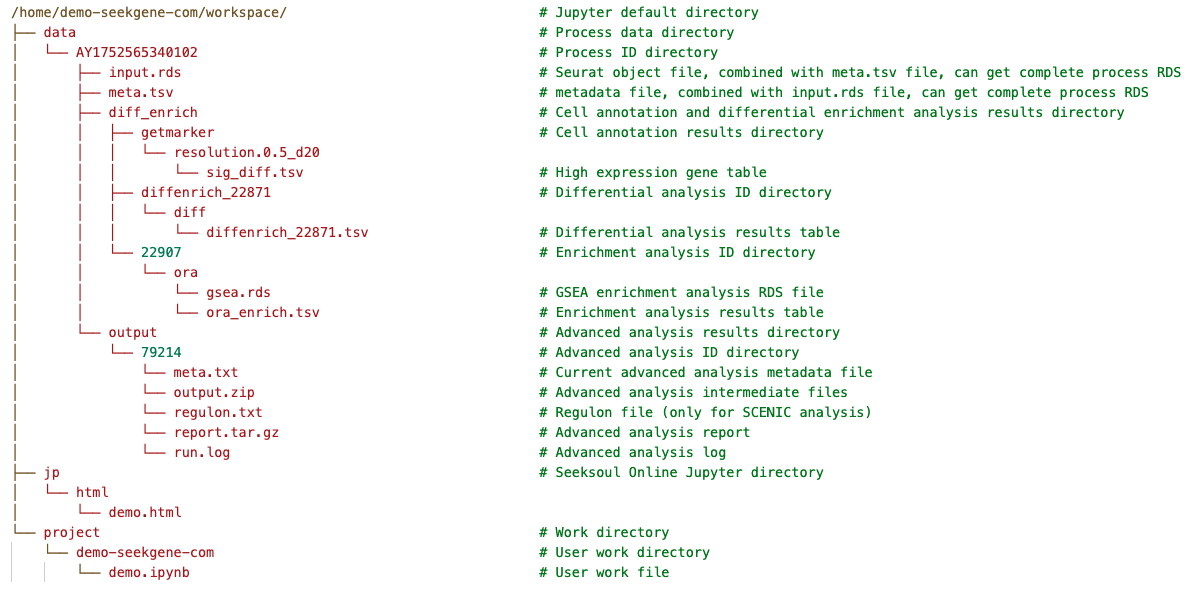
data (Read-Only)
- Path:
/home/{UserName}/workspace/data/ - Purpose: Stores analysis data for each analysis workflow, such as RDS files containing annotations and analysis information, as well as result files from advanced analyses like Monocle2.
- Mounting Instructions:
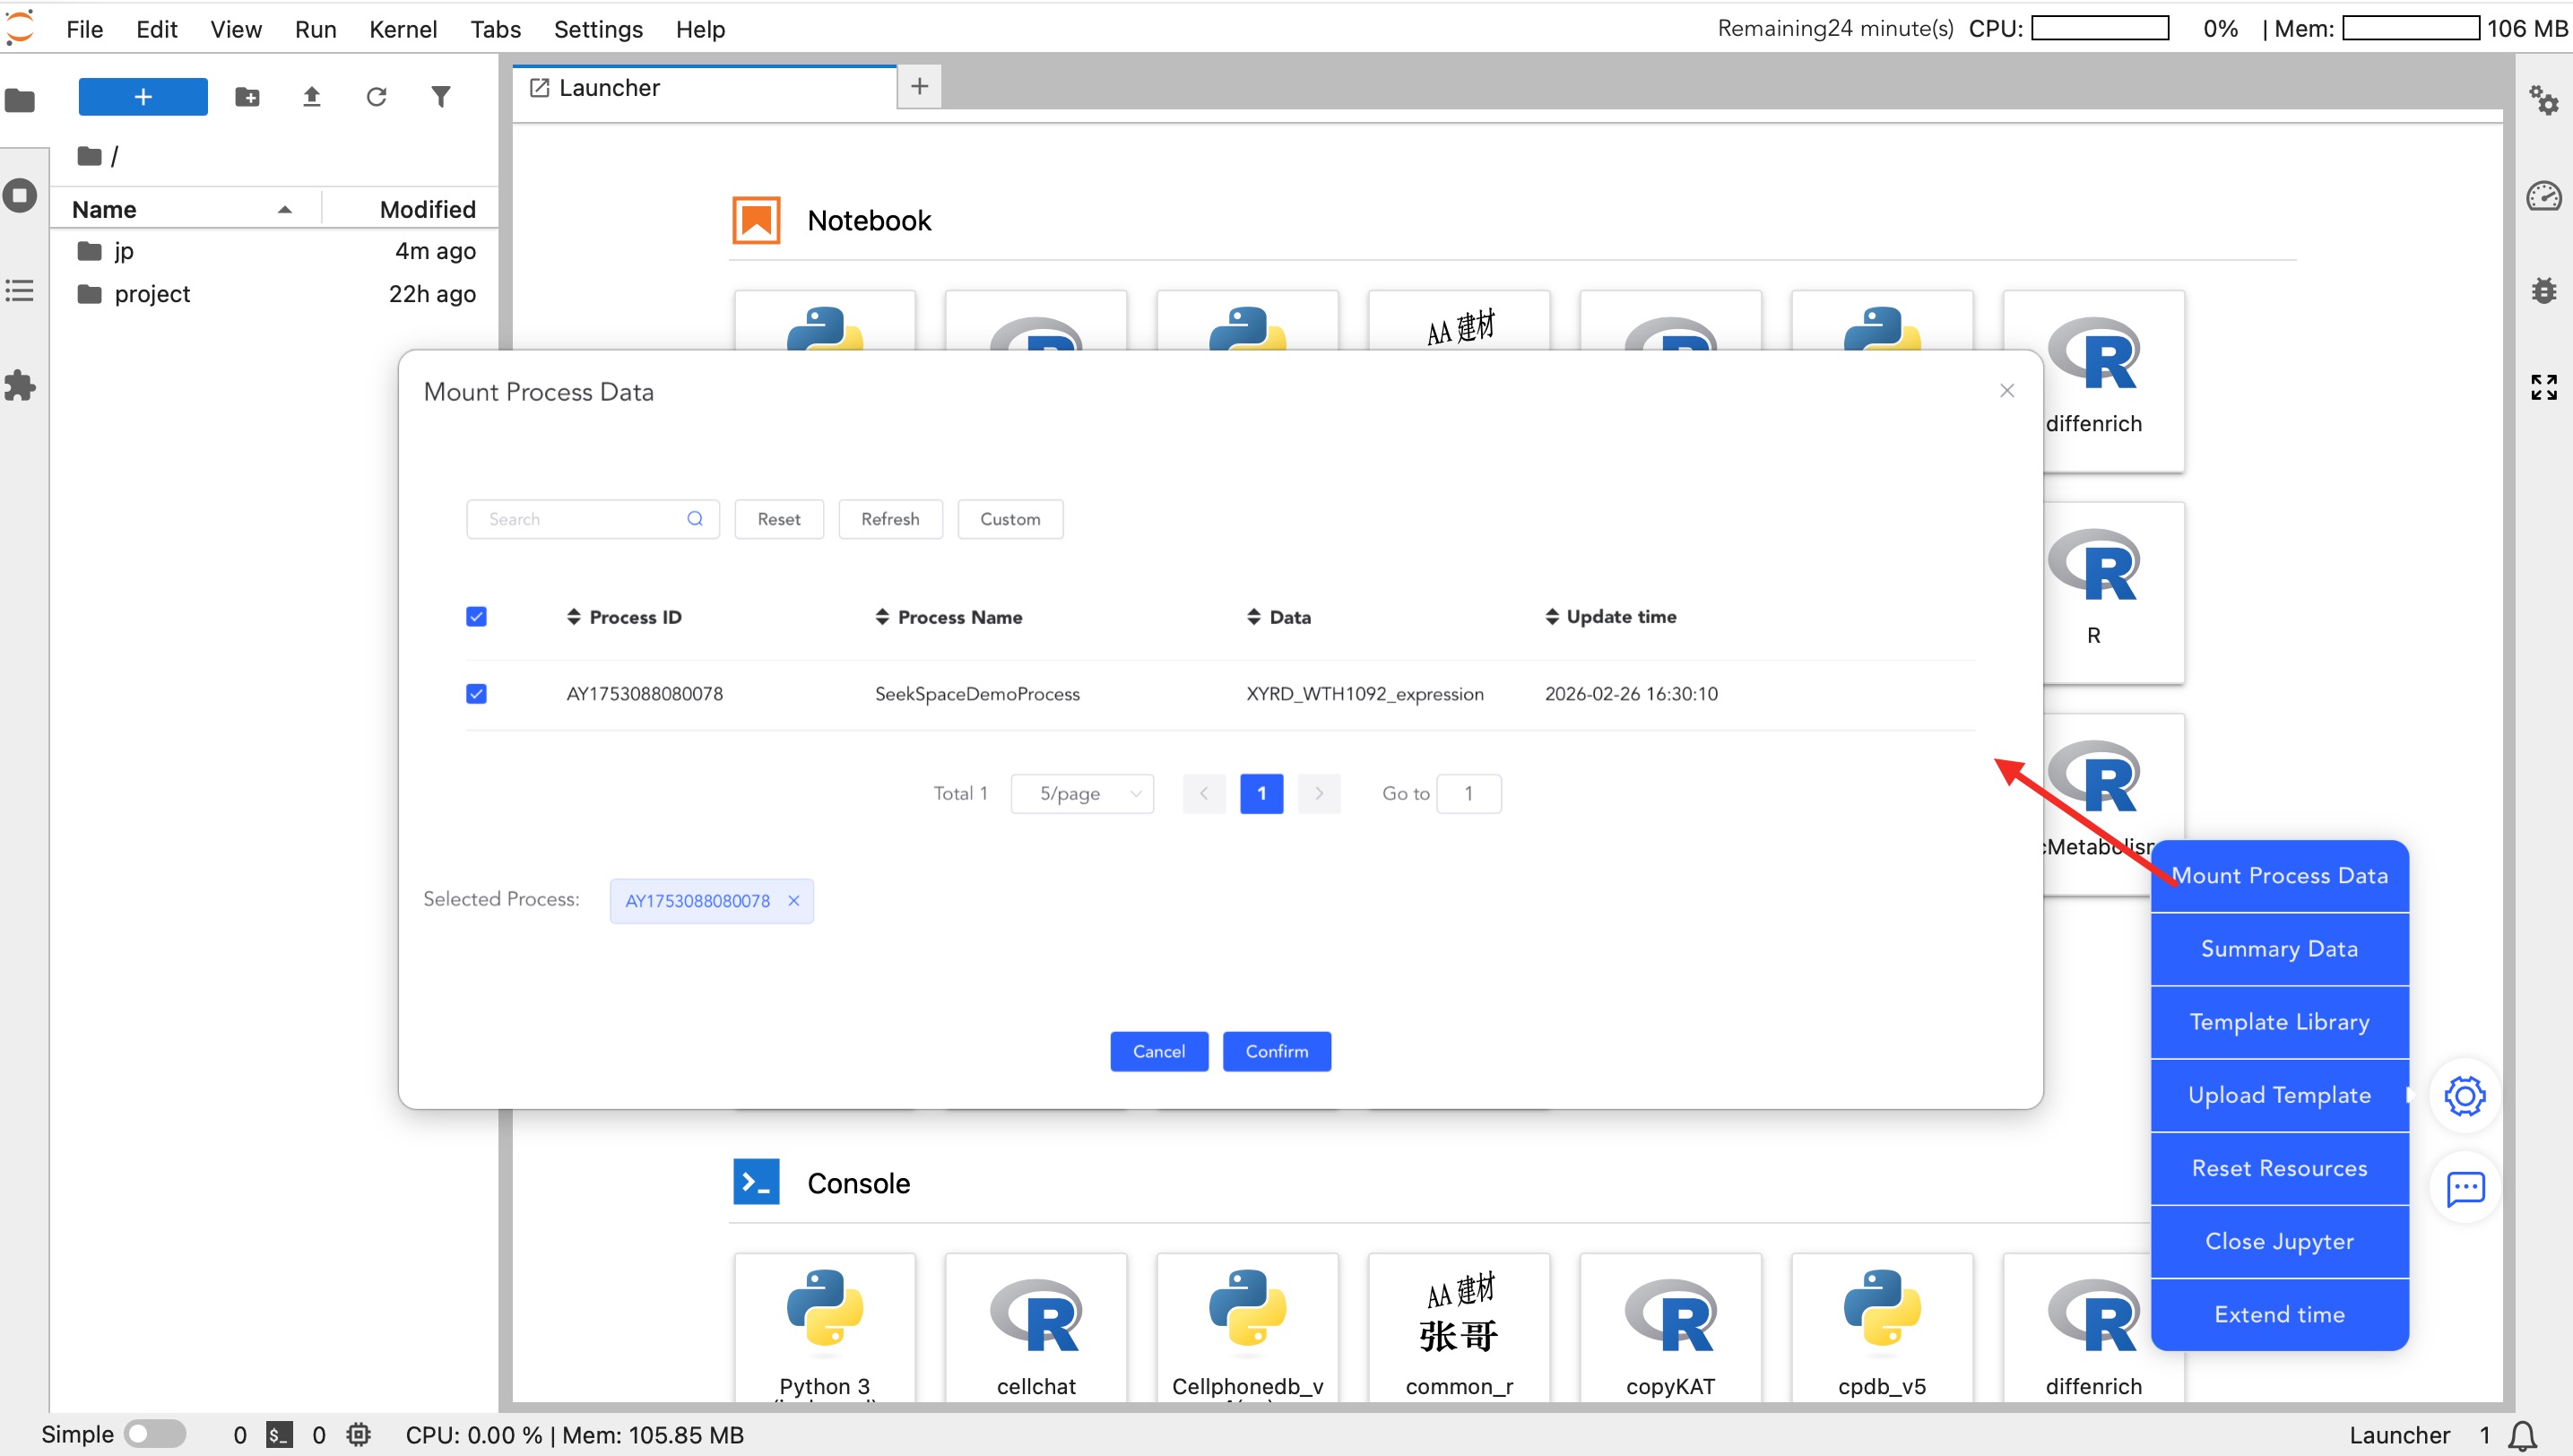
- Workflow data is not mounted by default. You need to check the corresponding workflow via the -> [Mount Process Data] function on the right side.
- Once checked, the corresponding workflow data (e.g.,
input.rds,meta.tsv) will appear in this directory; unchecking will unmount it.
- Data Structure:
- The workflow folder contains
input.rds(expression matrix) andmeta.tsv(metadata). - If you need to generate plots for advanced analysis results, it is recommended to copy the data to the
projectdirectory and unzip it for use.
- The workflow folder contains
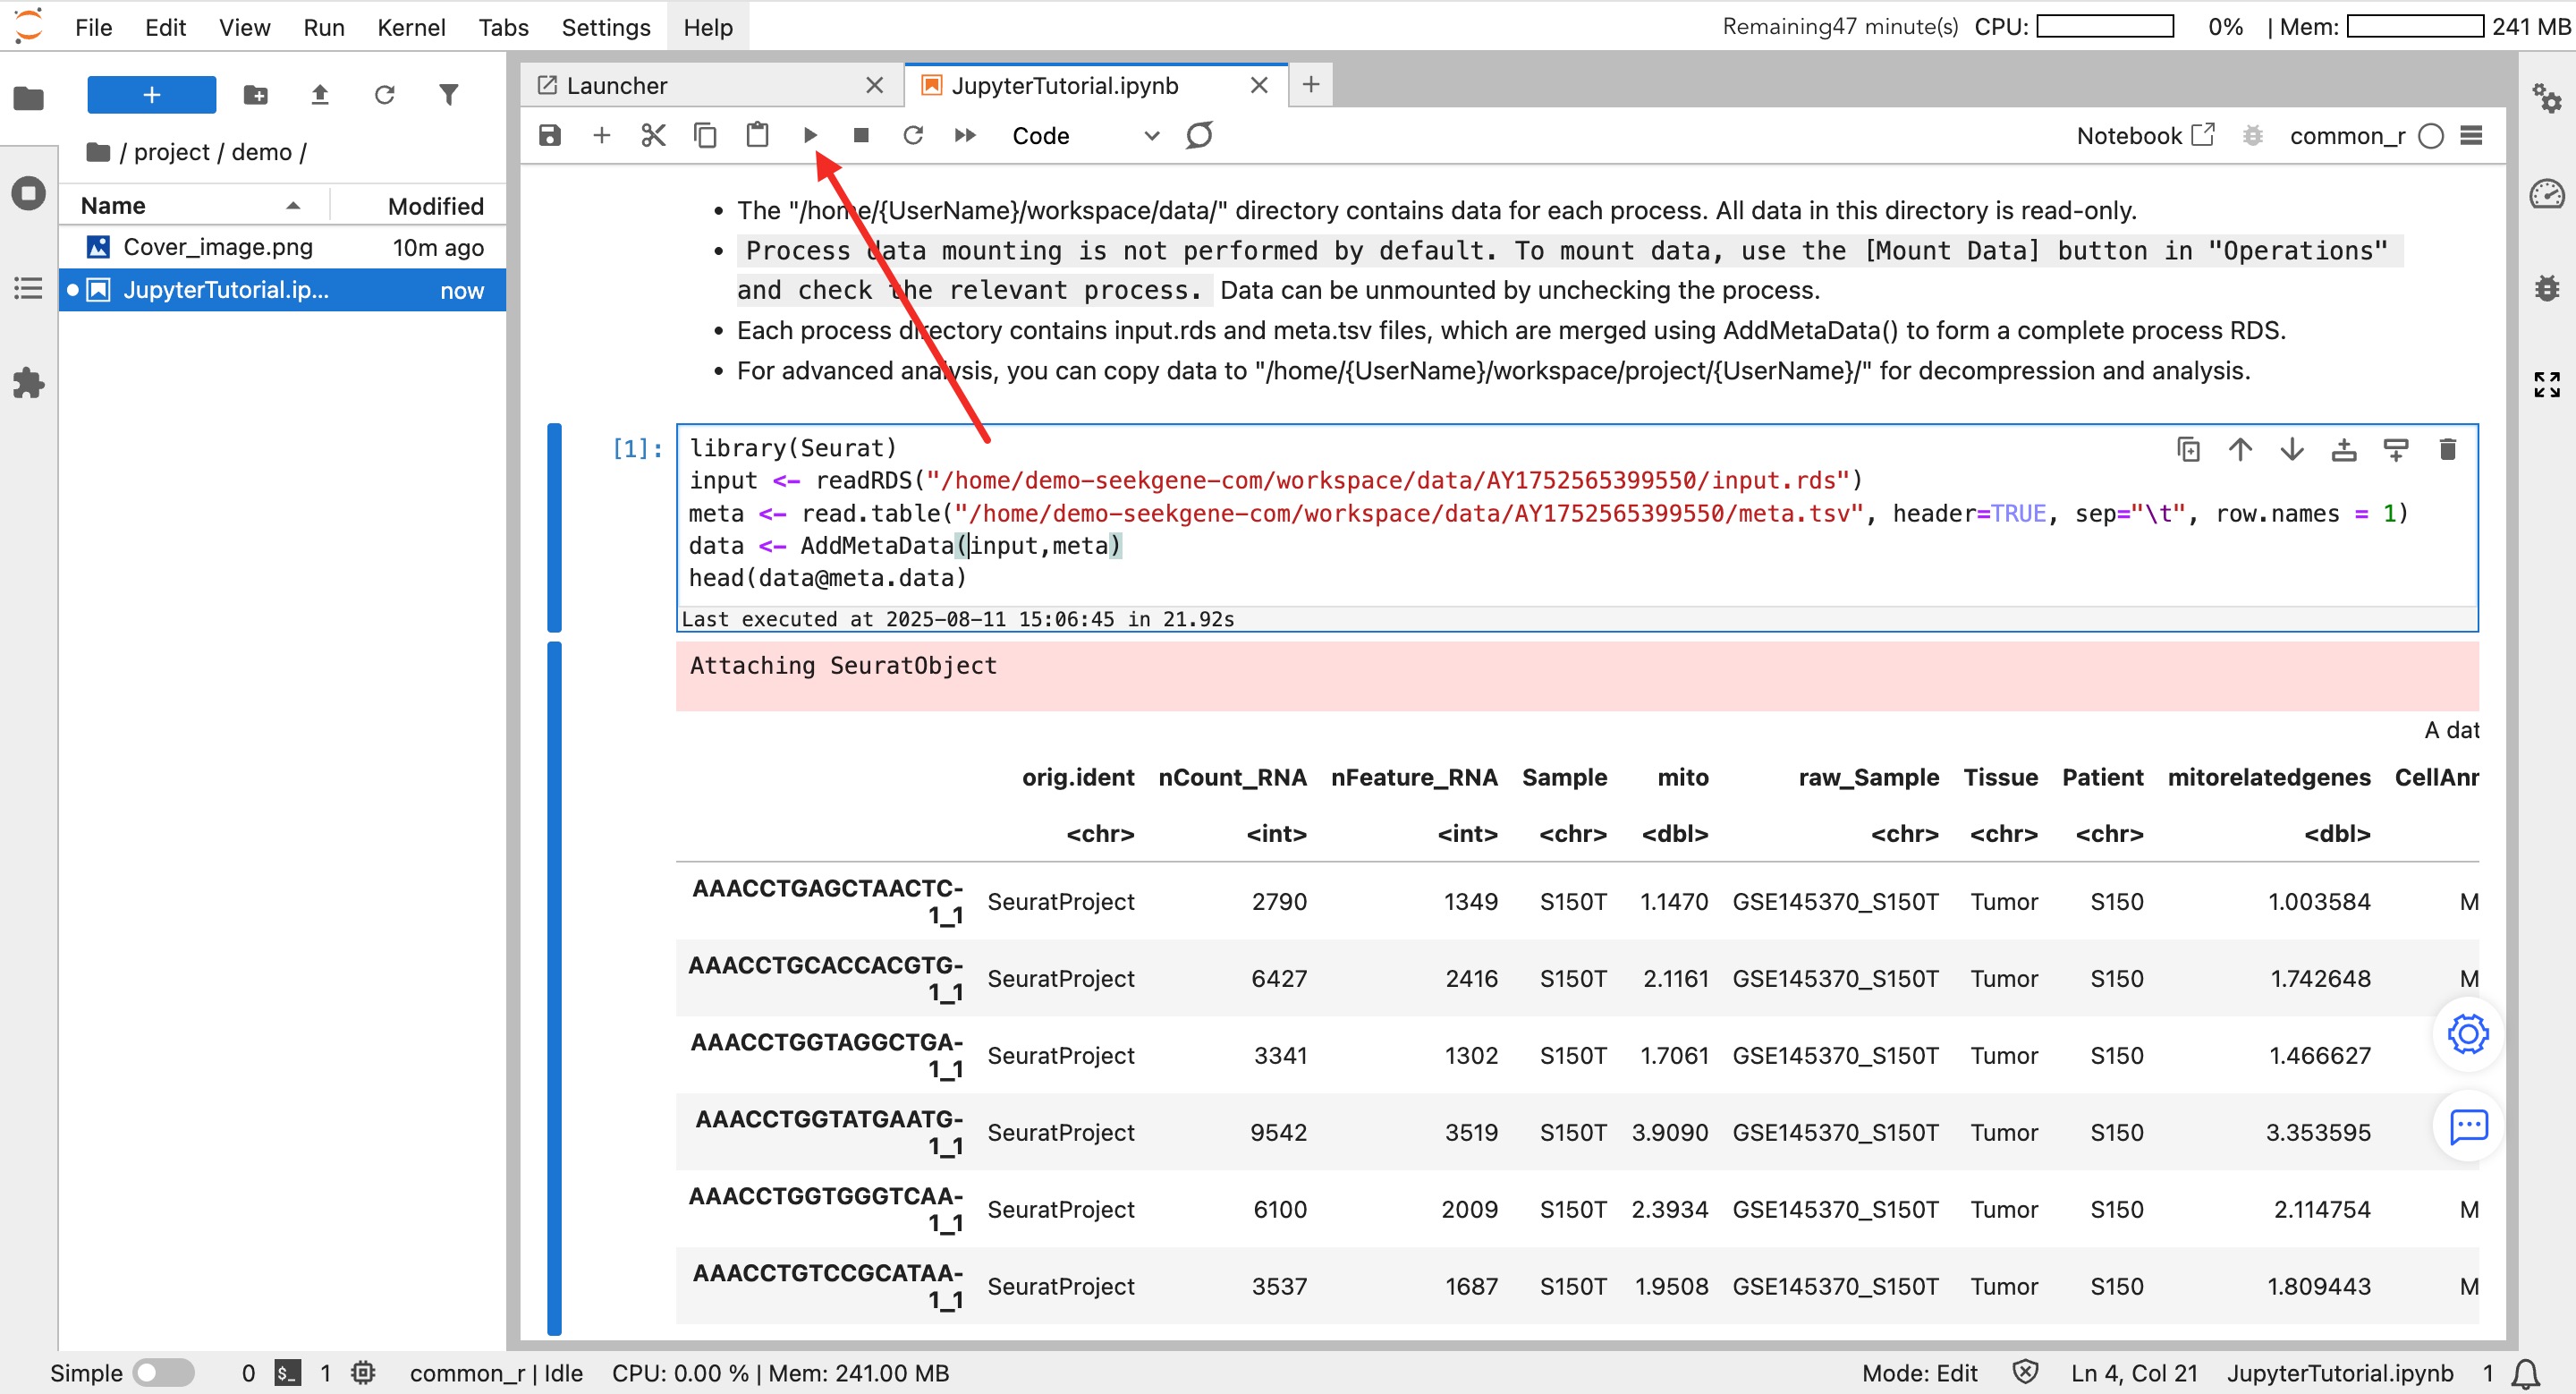
Data Reading Example (R):
library(Seurat)

# 1. Read expression matrix and metadata
# Path example: /home/demo-user/workspace/data/WorkflowID/
input <- readRDS("/home/demo-seekgene-com/workspace/data/AY1752565399550/input.rds")
meta <- read.table("/home/demo-seekgene-com/workspace/data/AY1752565399550/meta.tsv", header=TRUE, sep="\t", row.names = 1)

# 2. Merge into a complete Seurat object
data <- AddMetaData(input, meta)

# 3. View the first few rows of metadata
head(data@meta.data)
jp (Read-Only)
- Path:
/home/{UserName}/workspace/jp/ - Purpose: Primarily used to store HTML report files converted by Jupyter after closing the instance.
project (Read/Write)
- Path:
/home/{UserName}/workspace/project/{UserName}/ - Purpose: User Main Working Directory.
- Please ensure your analysis scripts (.ipynb) and result files are saved in this directory.
- Important: Only data saved in this directory will be persistently stored. It is recommended to enter this directory for all analysis operations.
- Permissions: You have read/write permissions for your own directory, but only read permissions for others' directories.
Page Features and Operation Guide
In the floating menu on the bottom right of the Jupyter page, core auxiliary functions of the platform are integrated.
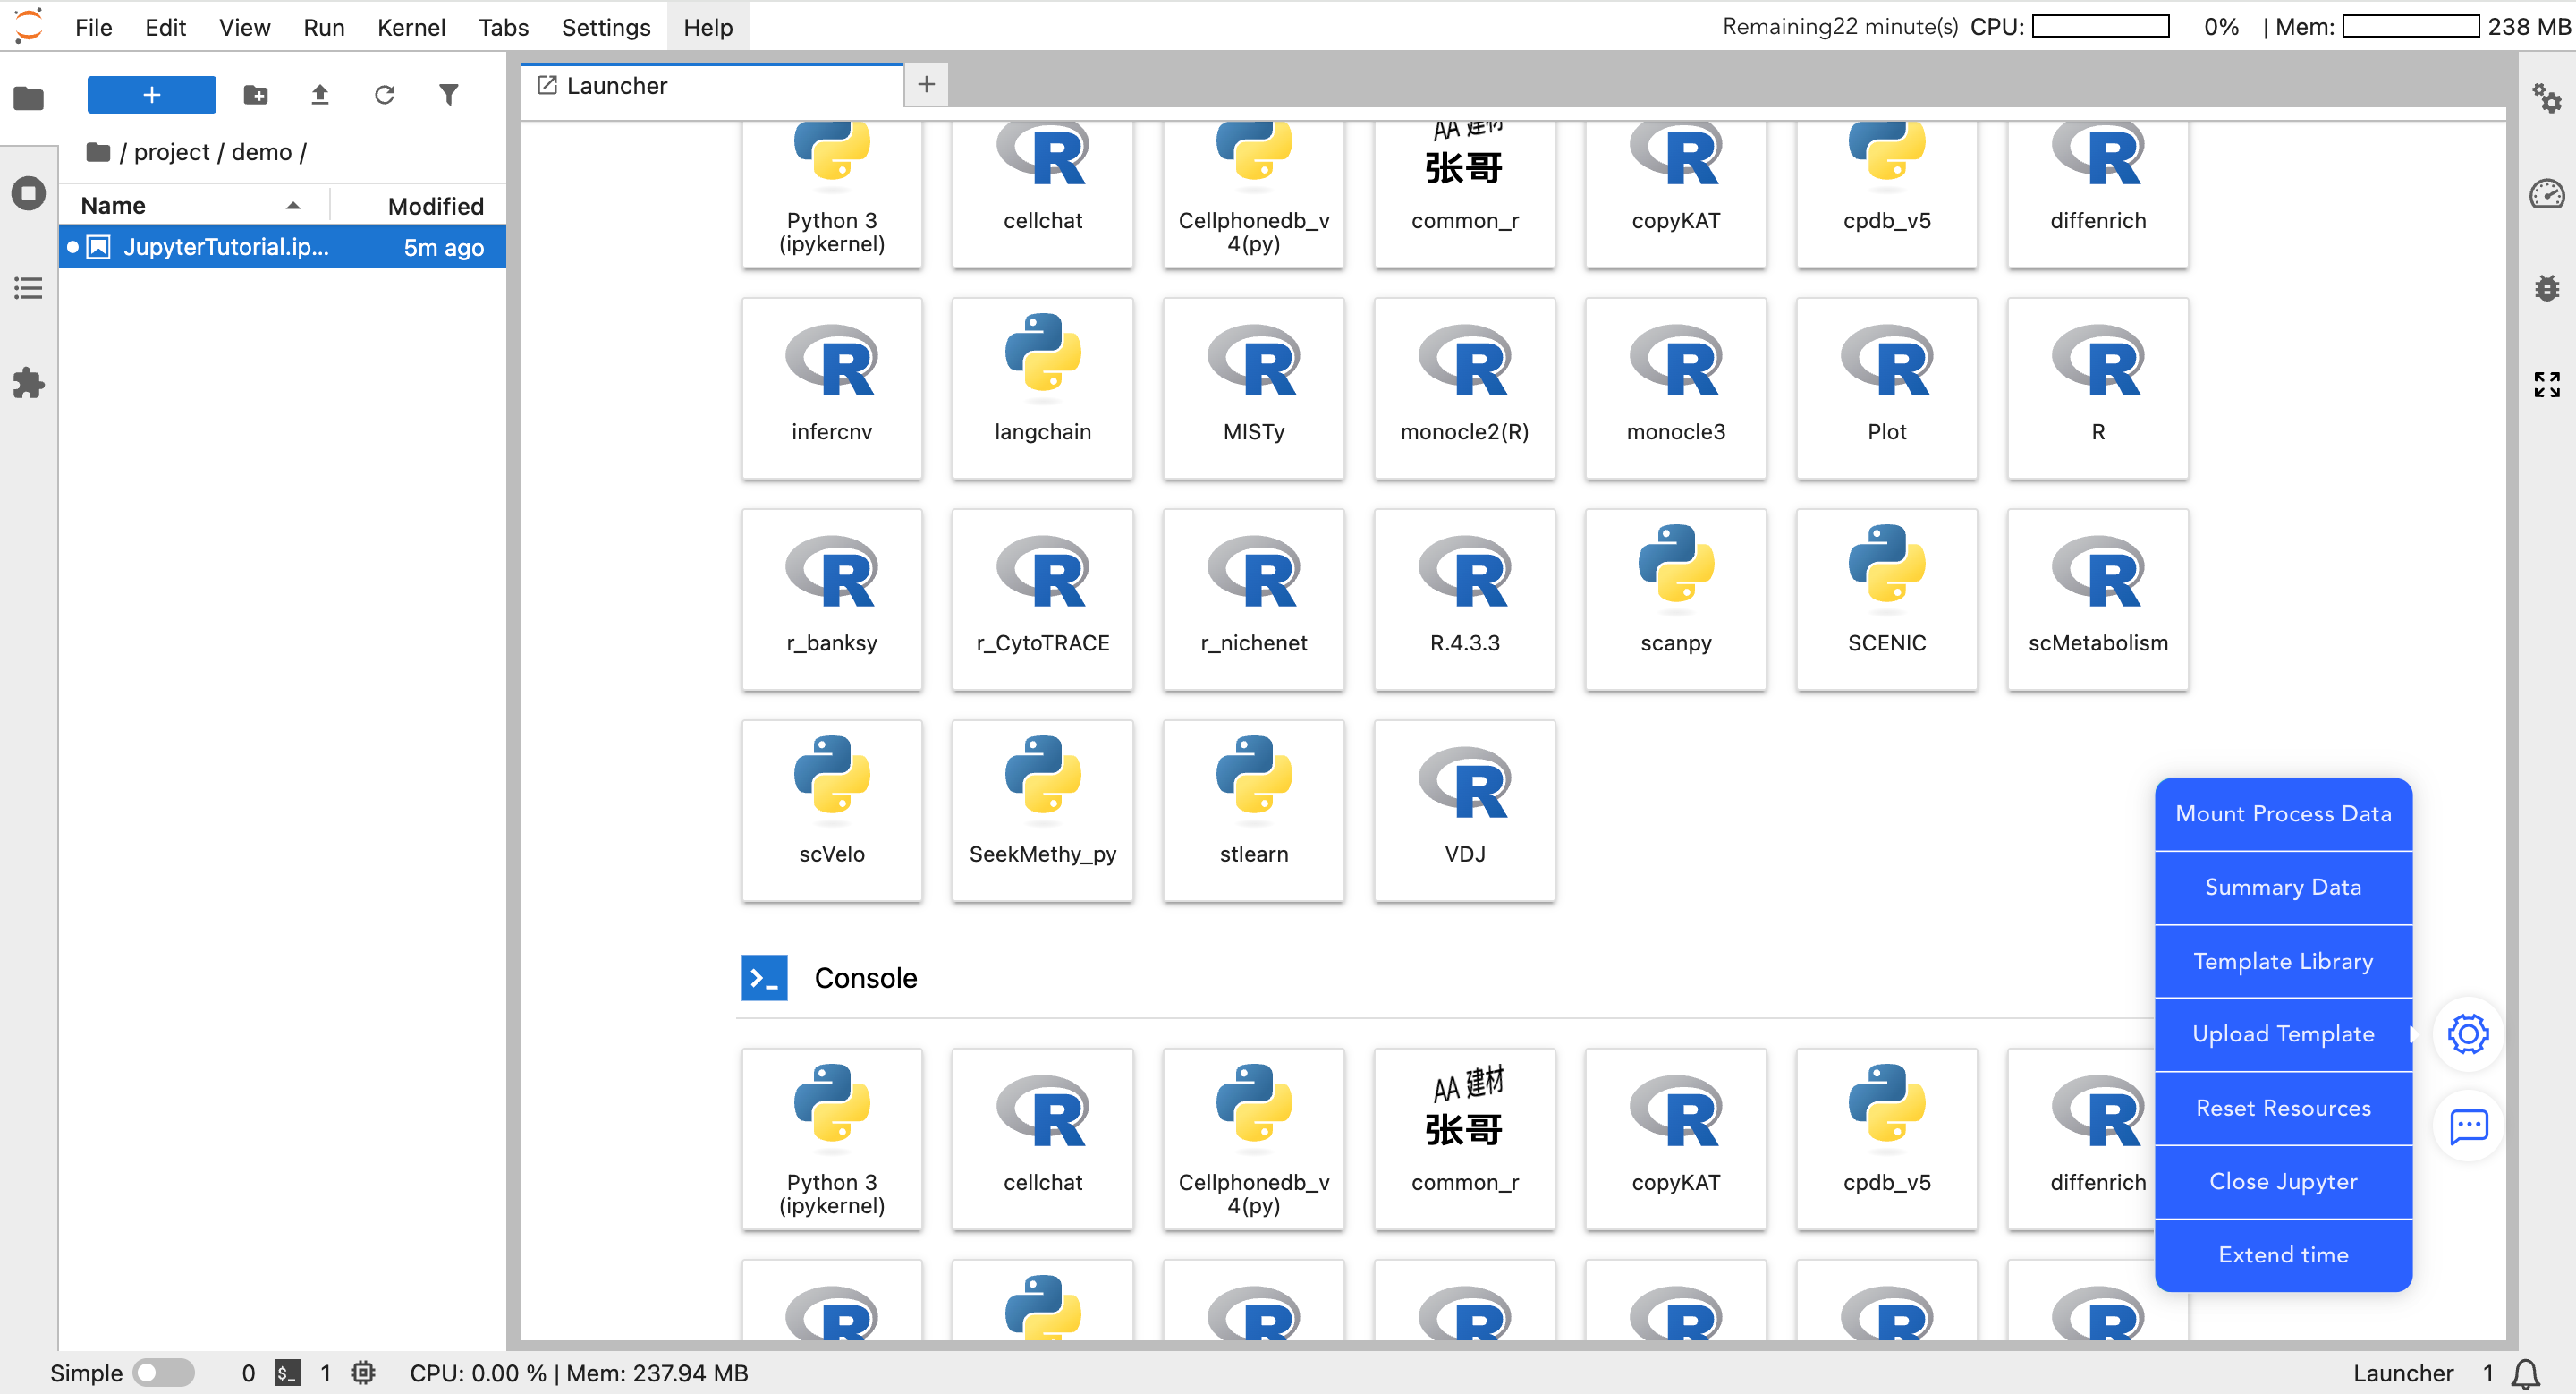
Data Mounting
- Mount My Data: Mount raw matrices and core analysis data you uploaded to the SeekGene analysis platform.
- Mount Workflow Data: Mount standardized workflow data and advanced analysis results under the "Personalized Analysis" project. Once mounted, you can perform custom plotting and secondary analysis.
Template Library
- Template Library: Download official standard analysis templates. After downloading, modify the input data path to quickly start analysis.
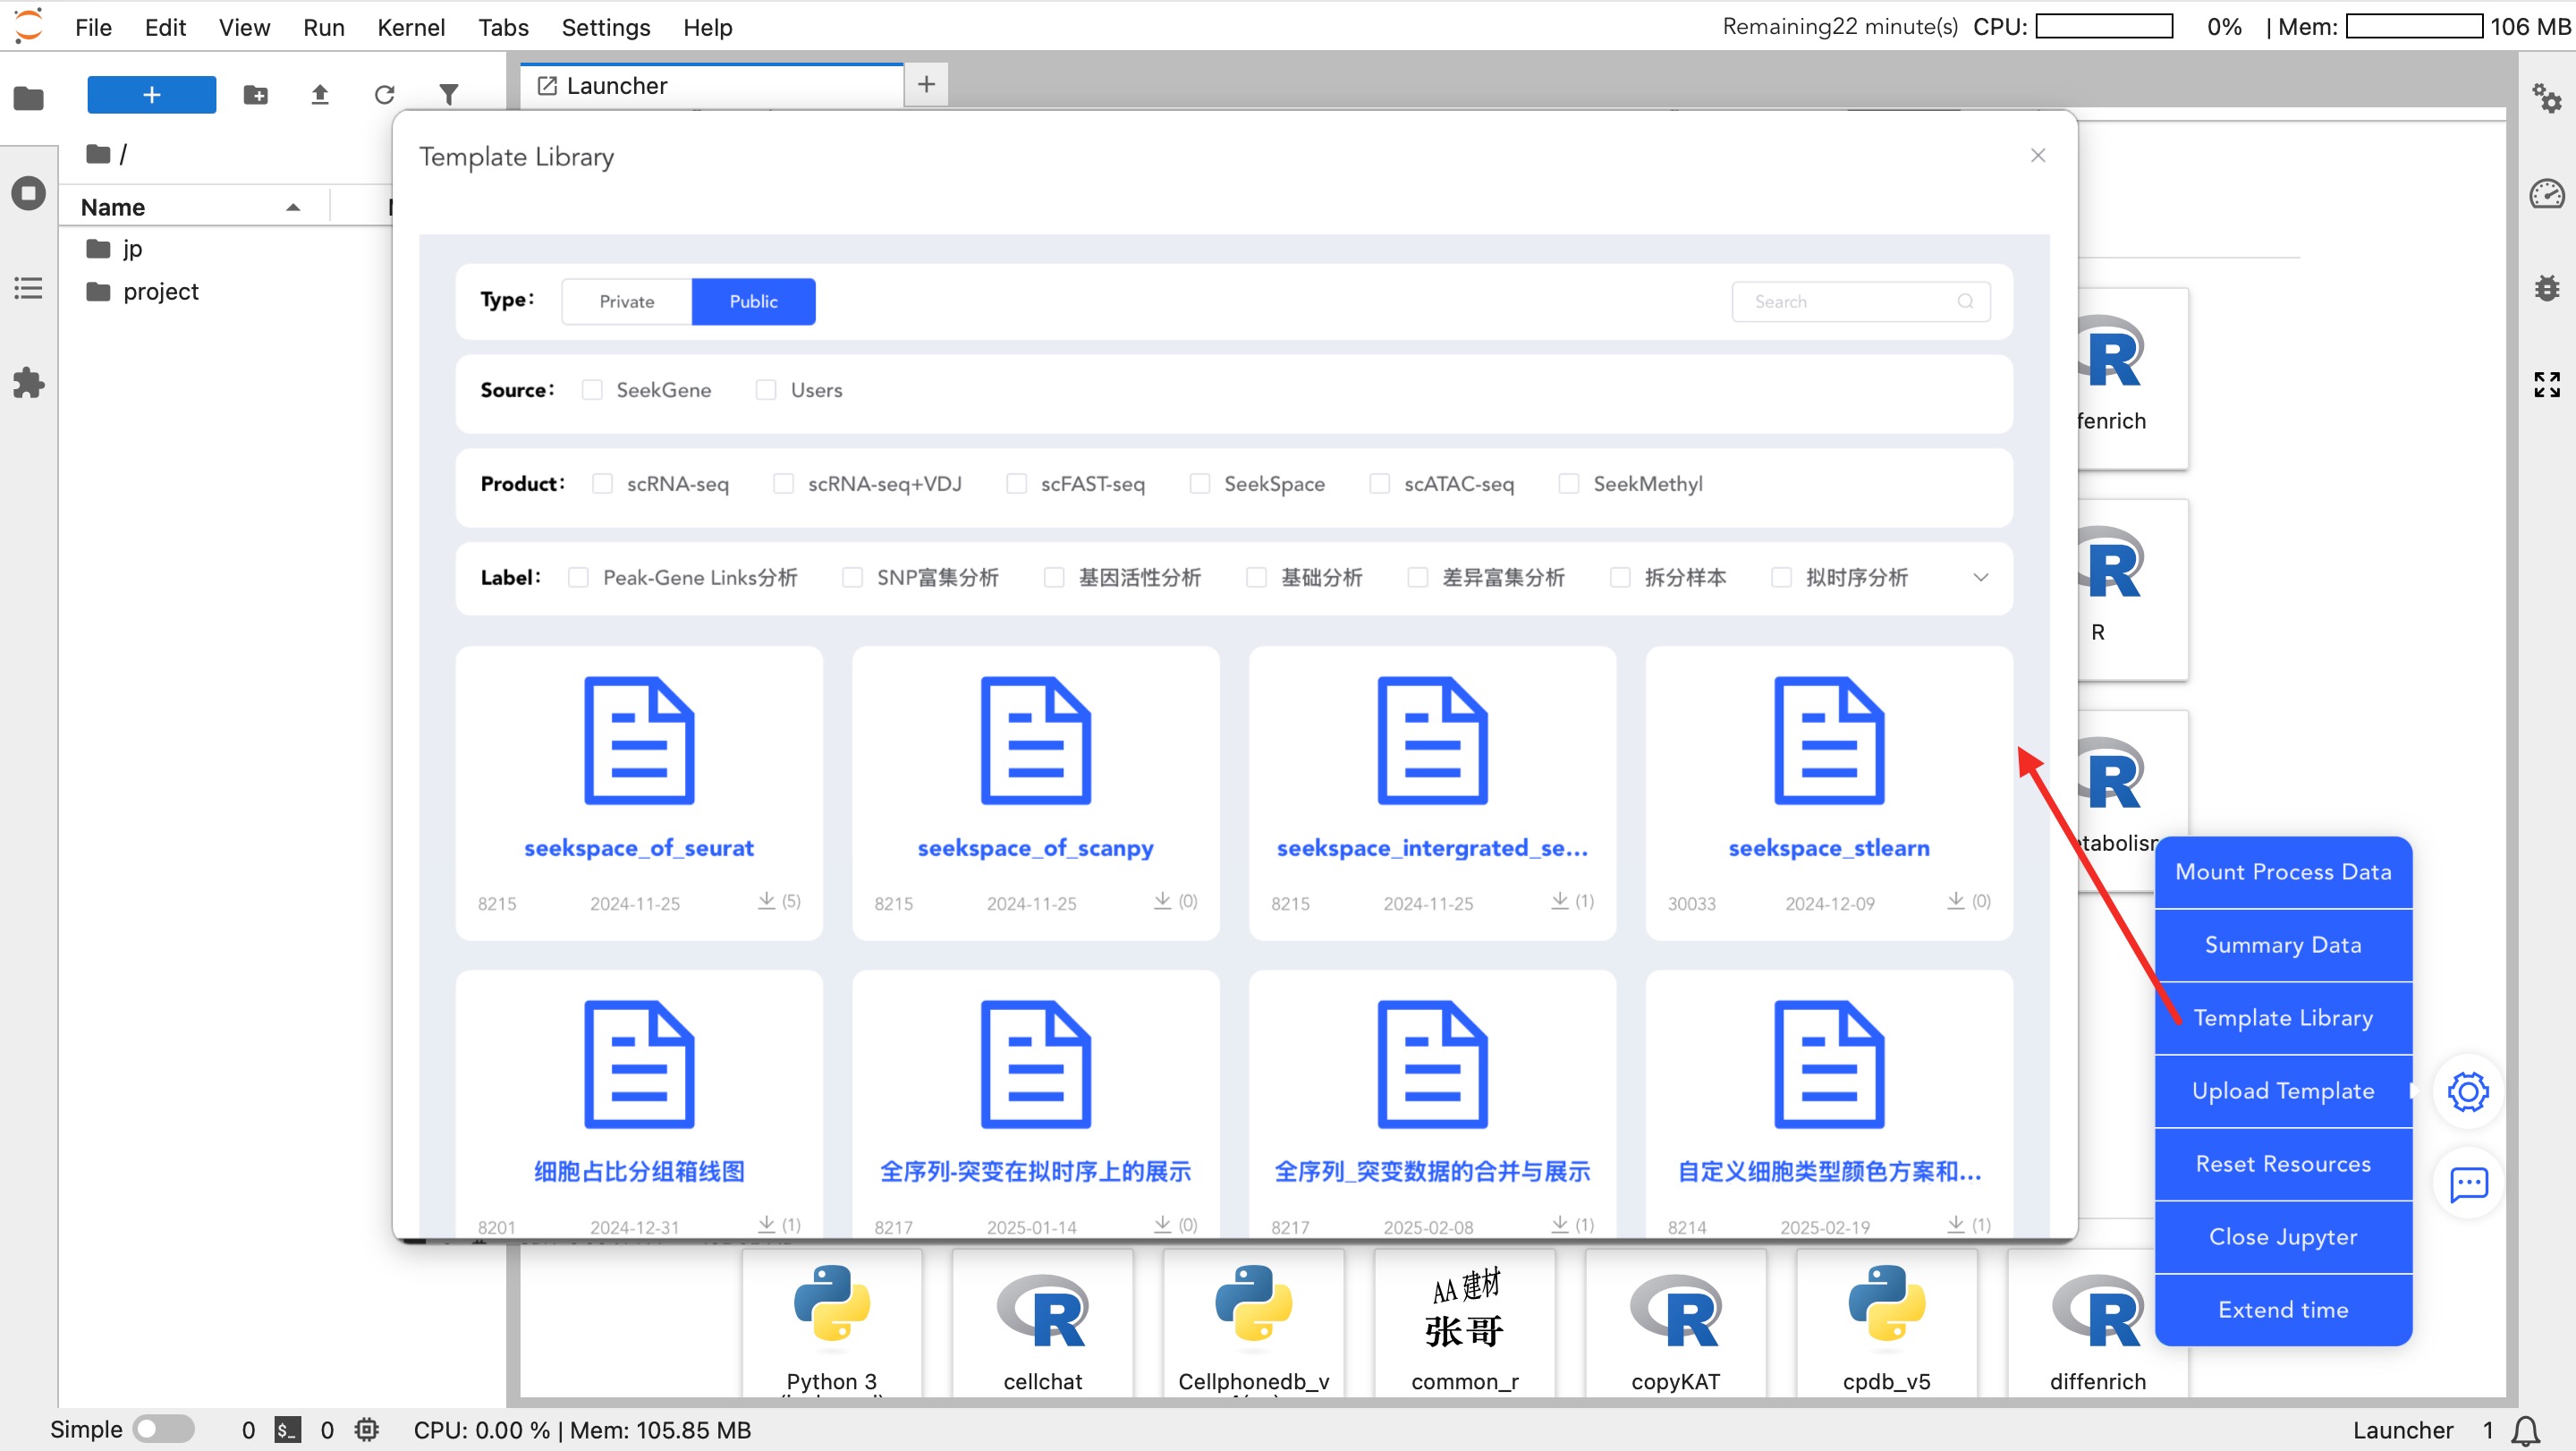
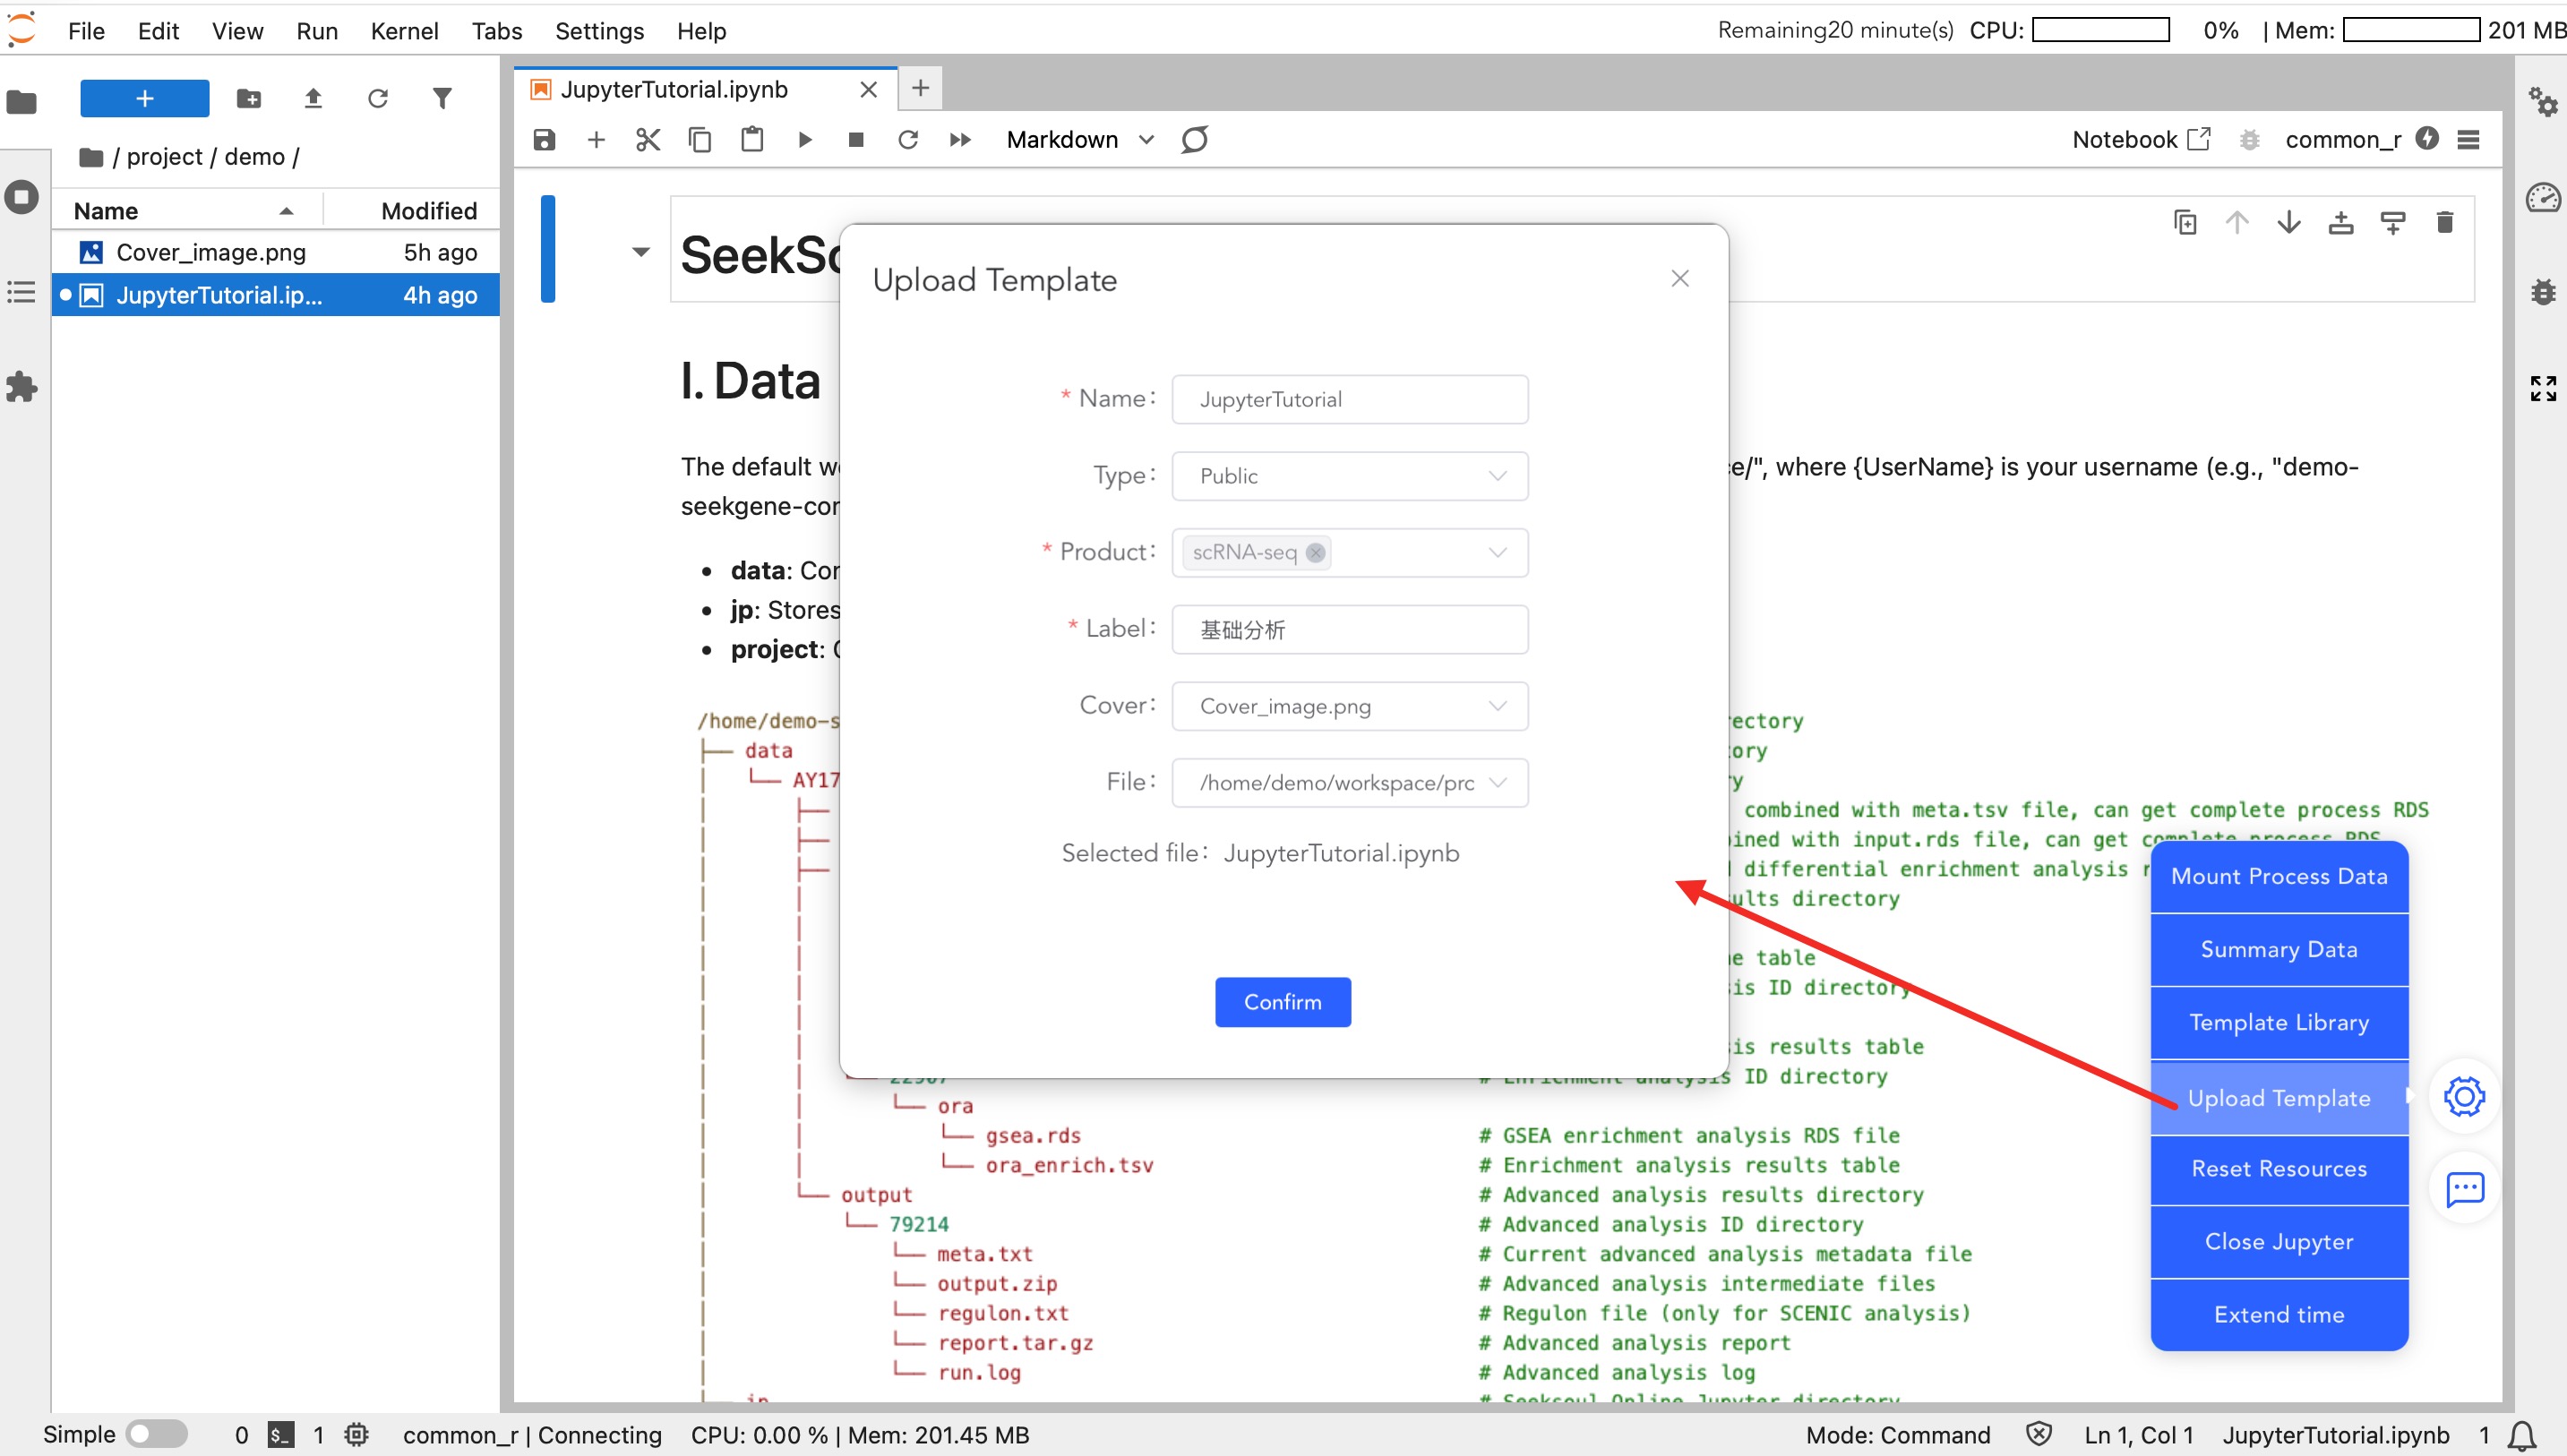
- Upload Template: Upload analysis templates written by you.
- Private: Visible only to you, facilitating code reuse across projects.
- Public: Shared with the team or all users.
Resource and Session Management
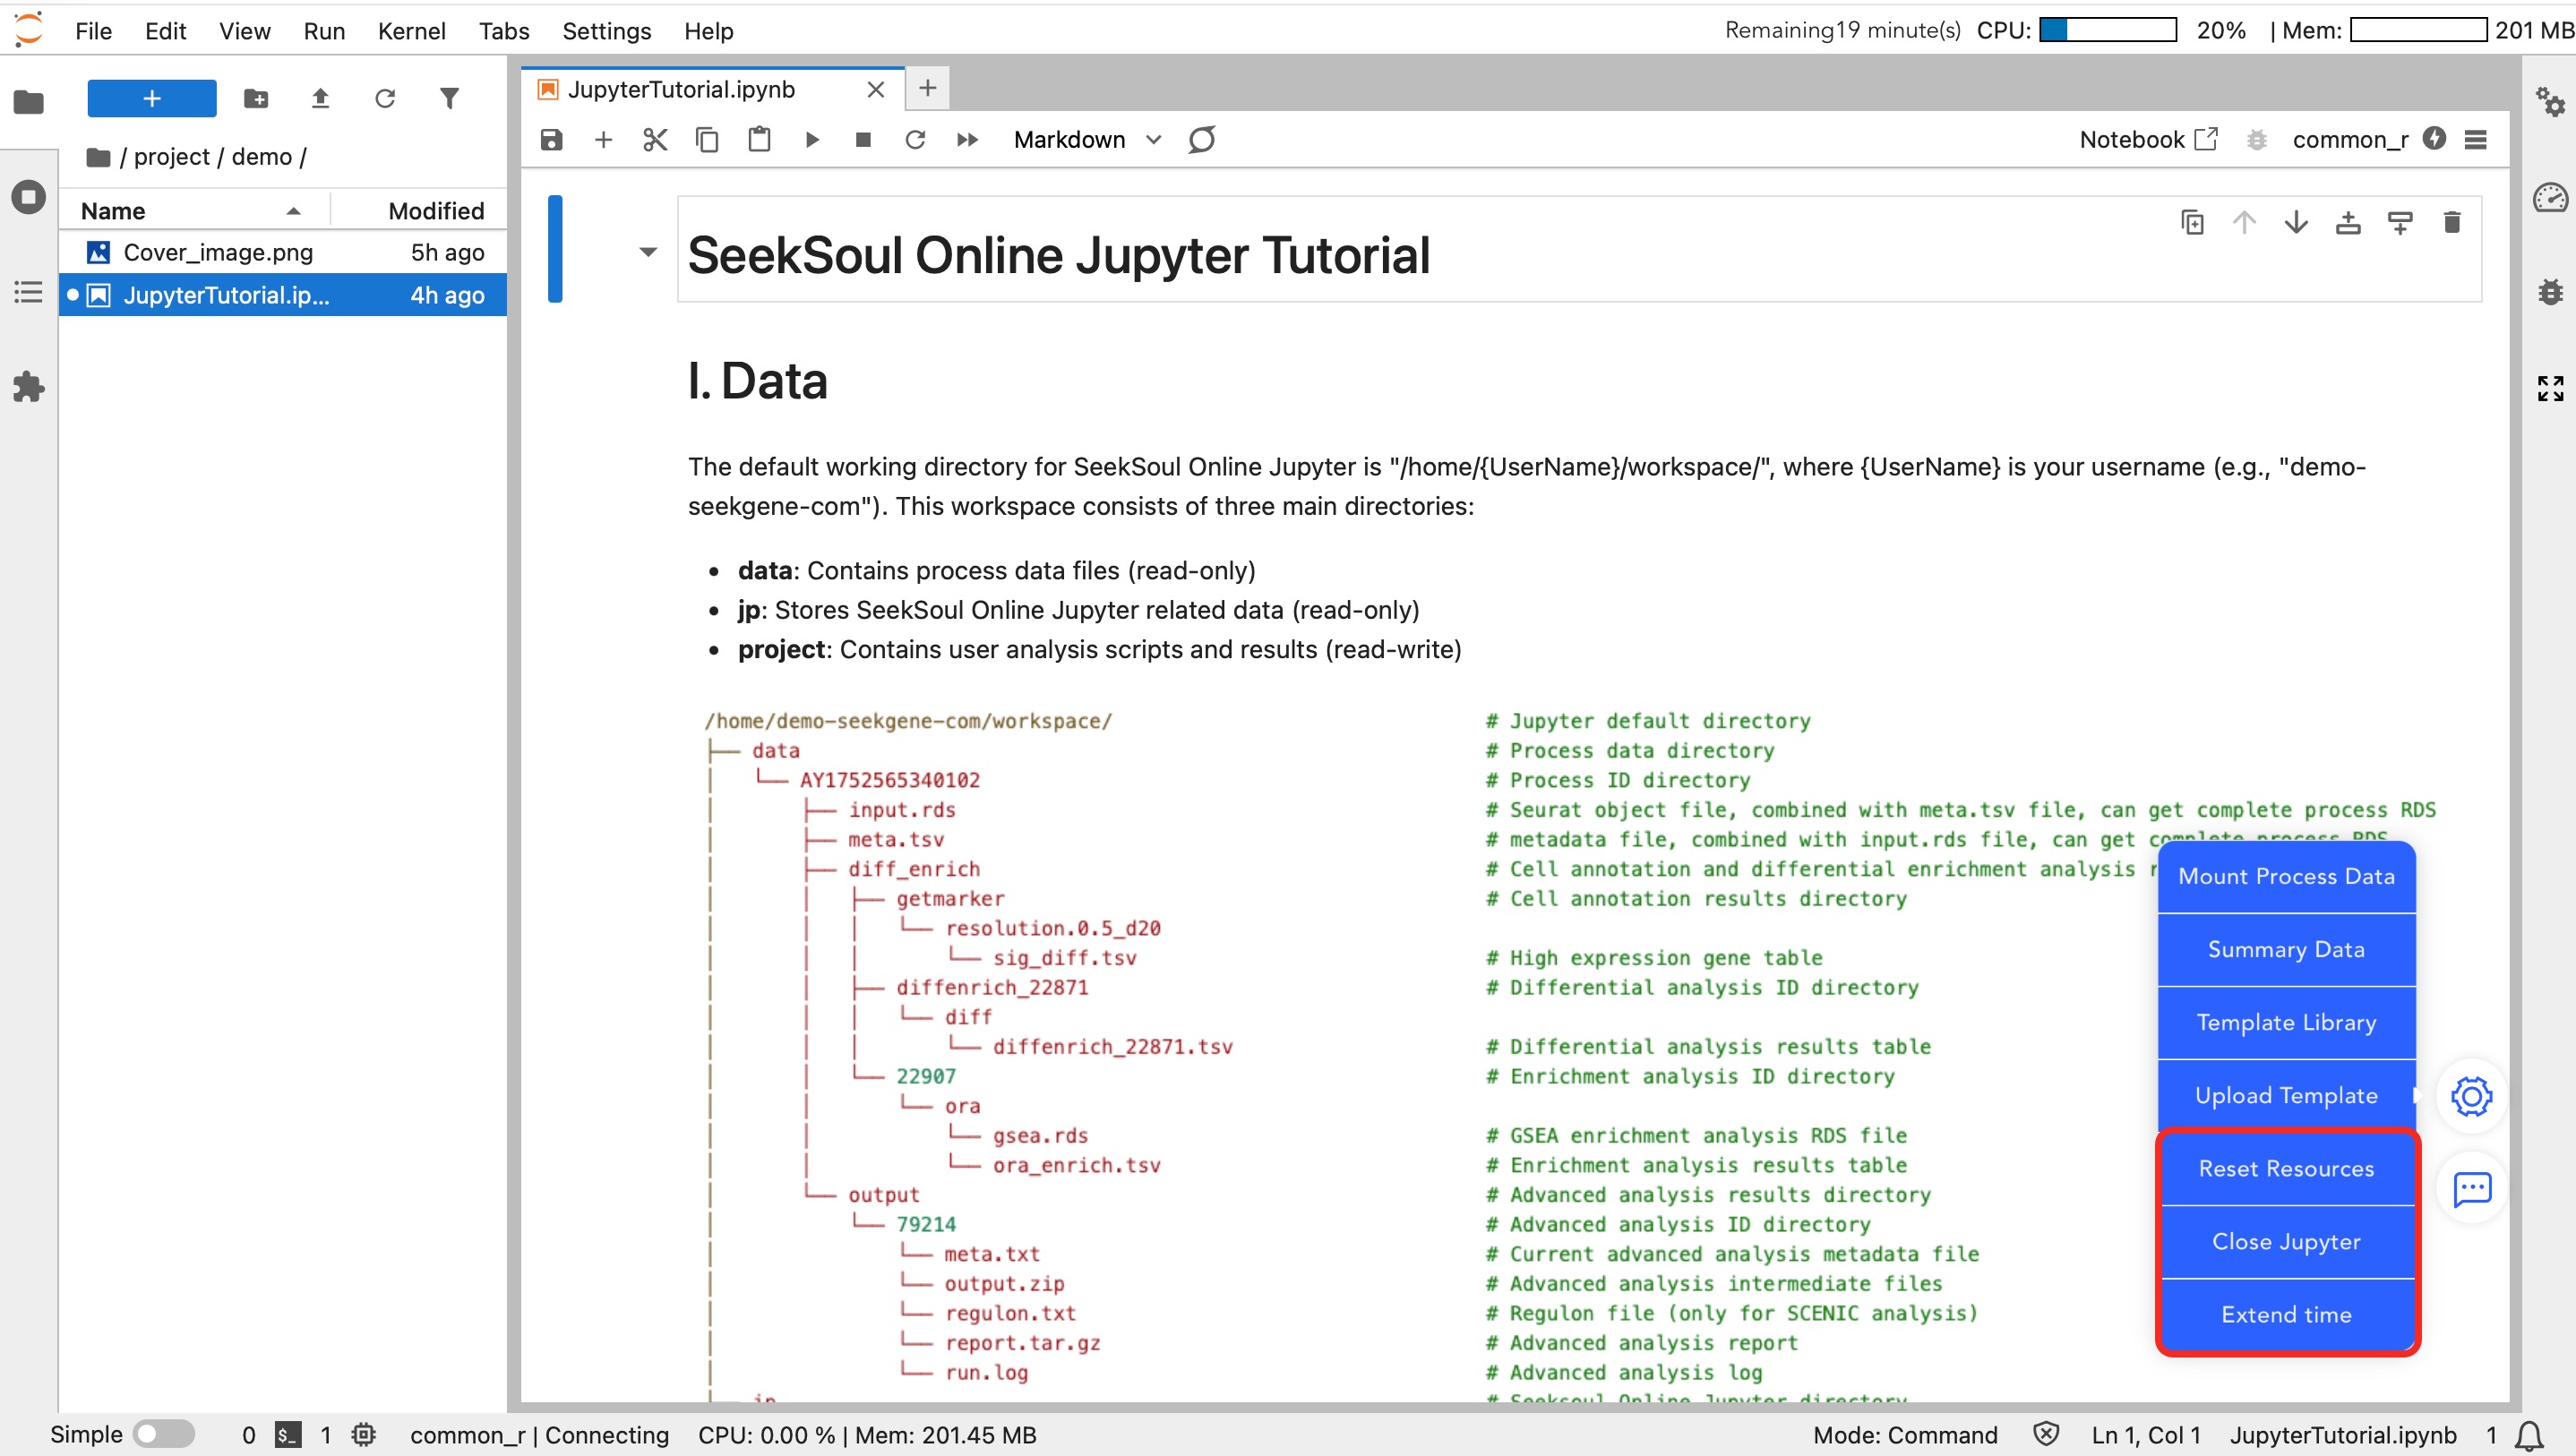
- Reset Resources: When computing resources (CPU/Memory) are insufficient, click this button to increase the configuration.
- Note: Adjusting resources requires restarting the instance. Temporary variables will not be retained, and code must be re-executed from the beginning.
- Close Jupyter: After analysis is complete, please manually click this button to close the instance and release resources.
- Extend Time: The instance automatically closes after 0.5 hours by default. If long-term analysis is required, be sure to click this button to extend usage time.
Jupyter Environment and Data Analysis Operations
Select Analysis Environment
- Enter Workspace: In the file browser on the left, double-click to enter the
project/{UserName}directory. - Select Kernel: Select an environment in the Launcher panel on the right.
- Recommended:
common_r(integrates common R bioinformatics packages, meeting most needs). - Other: You can also choose Python (Scanpy) or other specific environments as needed.
- Recommended:
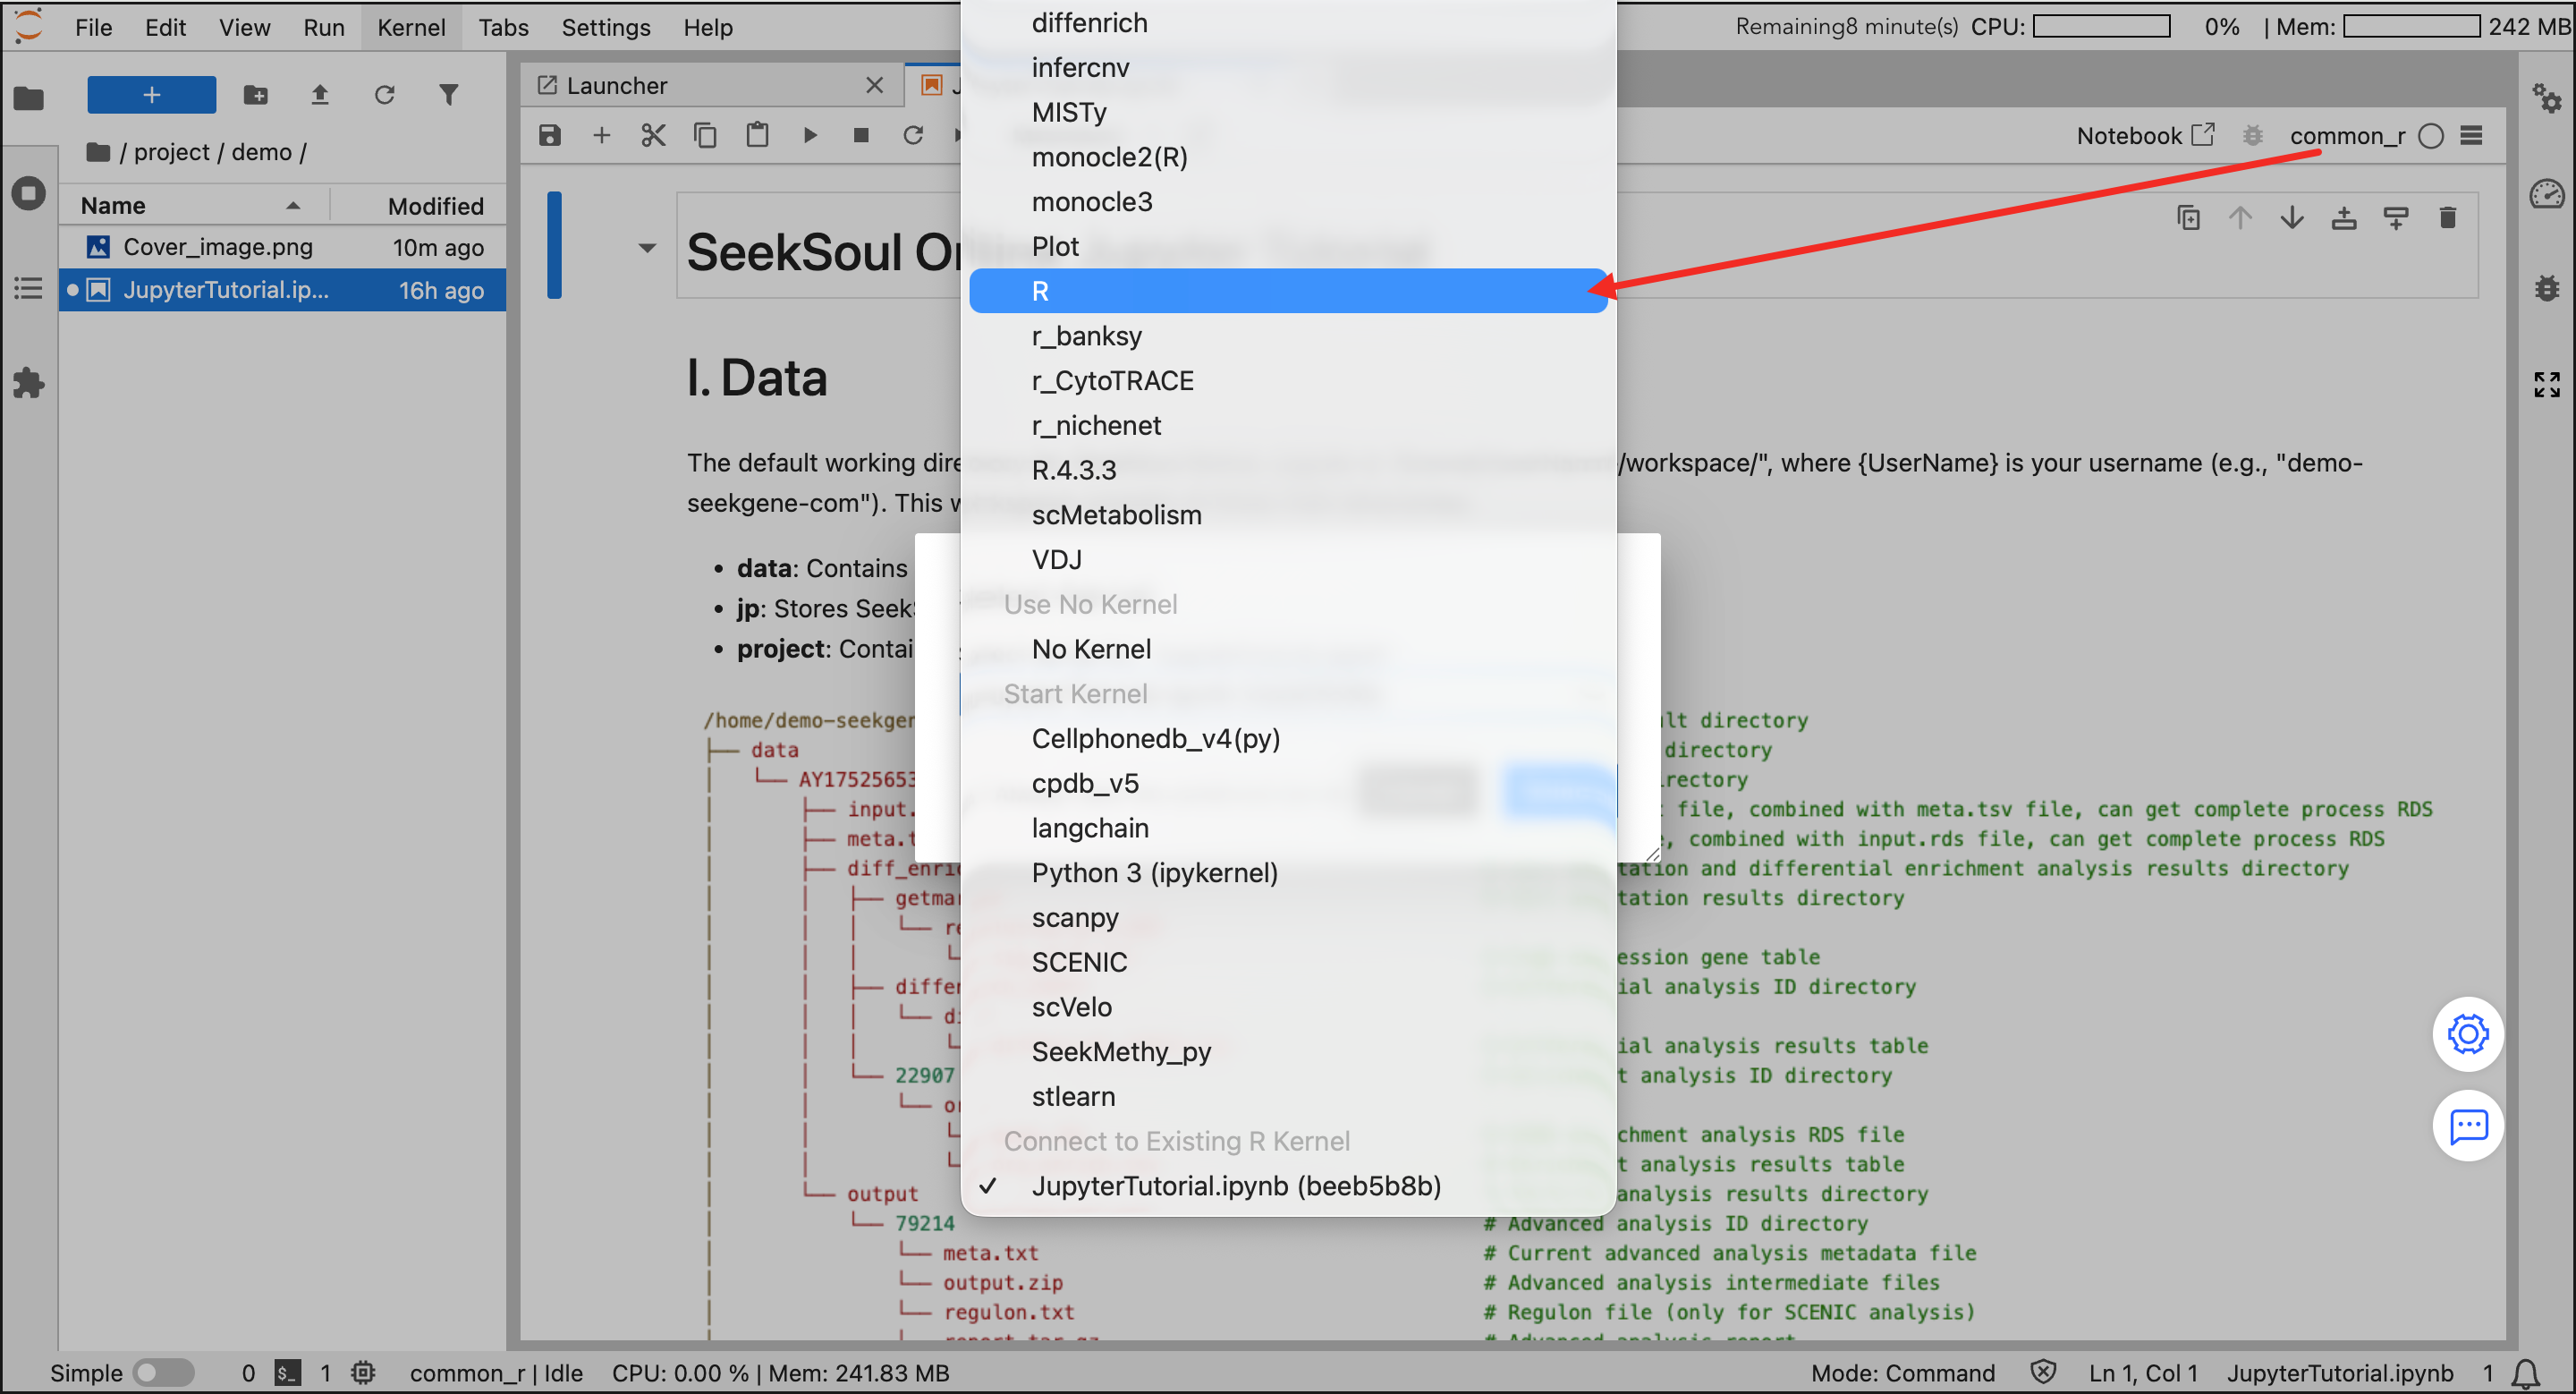
Create and Write Code
- New File: Click an environment icon (e.g.,
common_r) to automatically create a.ipynbfile in the current directory. - Write and Run: Enter code in the cell and click the ▶ button on the toolbar to run.
- Save Results: Use
Ctrl+Sto save. Generated images and files will be saved in yourprojectdirectory.
Upload External Data
If you need to analyze local private data:
- Click the "Upload" icon (up arrow) above the file browser on the left.
- Select the local file to upload.
- After uploading is complete, read the file name directly in the code.
Download Result Data
If you need to download analysis result data:
- In the file browser on the left, select the file to download.
- Right-click the file and select "Download" to download.
Custom Environment Management
If the platform's pre-configured environments do not meet your requirements, you can follow these steps to create a custom environment and register the kernel.
R Environment
Create R Environment
micromamba create --prefix /jp_envs/envs_user/{UserId}/DemoR # Create a new R environment using micromamba, {UserId} is the uid
micromamba activate /jp_envs/envs_user/{UserId}/DemoR # Activate the newly created R environment
micromamba install -c conda-forge -c bioconda -c defaults r-irkernel r-seurat=4.* # Install R related packages in the active environment: r-irkernel for Jupyter kernel, r-seurat for single-cell analysis
Start R interactive environment:
R # Start R interactive environment
Sys.setenv(PATH = paste("/home/mambauser/bin:/home/mambauser/env/jupyter/bin",Sys.getenv("PATH"), sep = ":")) # Set PATH variable in R environment
IRkernel::installspec(name = 'DemoR', displayname = 'DemoR', prefix = '/jp_envs/kernels_user/{UserId}/') # Install R kernel to Jupyter, specifying kernel name, display name, and installation path
q() # Exit R environment
Register Kernel:
jupyter kernelspec install /jp_envs/kernels_user/{UserId}/share/jupyter/kernels/demor --user # Install R kernel to user Jupyter environment, note kernel name must be lowercase
micromamba deactivate # Deactivate current environment
Delete R Environment
jupyter-kernelspec remove demor # Remove R kernel from Jupyter, note the kernel name to delete is lowercase
micromamba env remove --prefix /jp_envs/envs_user/{UserId}/DemoR # Delete the created R environment
Python Environment
Create Python Environment
micromamba create --prefix /jp_envs/envs_user/{UserId}/DemoPython # Create a new Python environment using micromamba
micromamba activate /jp_envs/envs_user/{UserId}/DemoPython # Activate the newly created Python environment
micromamba install -c conda-forge -c bioconda -c defaults ipykernel scanpy # Install Python related packages in the active environment: ipykernel for Jupyter kernel, scanpy for single-cell analysis
python -m ipykernel install --name DemoPython --display-name "DemoPython" --prefix /jp_envs/kernels_user/{UserId}/ # Install Python kernel to Jupyter, specifying kernel name, display name, and installation path
jupyter kernelspec install /jp_envs/kernels_user/{UserId}/share/jupyter/kernels/demopython --user # Install Python kernel to user Jupyter environment, note kernel name must be lowercase
micromamba deactivate # Deactivate current environment
Delete Python Environment
jupyter-kernelspec remove demopython # Remove Python kernel from Jupyter, note the kernel name to delete is lowercase
micromamba env remove --prefix /jp_envs/envs_user/{UserId}/DemoPython # Delete the created Python environment