运行
使用方法
激活环境
conda activate seeksoulmethyl运行双组学分析(Shell 脚本)
# sc_methy_workflow.sh 可以在您克隆的 SeekSoulMethyl 目录中找到
bash sc_methy_workflow.sh \
/path/to/expression_R1.fastq.gz \
/path/to/expression_R2.fastq.gz \
/path/to/methy_R1.fastq.gz \
/path/to/methy_R2.fastq.gz \
--sample WTJW880 \
--outdir /path/to/results \
--database_dir /path/to/human-reference-GRCh38 \
--chemistry DD-MET3 \
--core 64 \
--filter_ch 2
如果样本有多个数据集,请用逗号分隔文件路径。确保 FASTQ 文件按每个数据集的正确顺序列出。
bash sc_methy_workflow.sh \
/path/to/WTJW969_E_L003_R1.fq.gz,/path/to/WTJW969_E_L004_R1.fq.gz \
/path/to/WTJW969_E_L003_R2.fq.gz,/path/to/WTJW969_E_L004_R2.fq.gz \
/path/to/WTJW969_Met_L000_R1.fq.gz,/path/to/WTJW969_Met_L001_R1.fq.gz,/path/to/WTJW969_Met_L002_R1.fq.gz,/path/to/WTJW969_Met_L003_R1.fq.gz,/path/to/WTJW969_Met_L004_R1.fq.gz \
/path/to/WTJW969_Met_L000_R2.fq.gz,/path/to/WTJW969_Met_L001_R2.fq.gz,/path/to/WTJW969_Met_L002_R2.fq.gz,/path/to/WTJW969_Met_L003_R2.fq.gz,/path/to/WTJW969_Met_L004_R2.fq.gz \
--sample WTJW969 \
--outdir /path/to/results \
--database_dir /path/to/human-reference-GRCh38 \
--chemistry DD-MET5 \
--core 64 \
--filter_ch 2
输入参数:
- $1: 单细胞转录组 Read1 fastq 文件路径。
- $2: 单细胞转录组 Read2 fastq 文件路径。
- $3: 单细胞甲基化 Read1 fastq 文件路径。
- $4: 单细胞甲基化 Read2 fastq 文件路径。
- sample: 样本名称。
- outdir: 输出目录路径。
- database_dir: 参考基因组路径。
- chemistry: 甲基化试剂盒(DD-MET3 或 DD-MET5)。DD-MET3 为双标签数据集,表示同一细胞的 RNA 和 DNA 甲基化数据具有不同的条形码;而 DD-MET5 为单标签数据集,表示同一细胞的 RNA 和 DNA 甲基化数据具有相同的条形码。
- core: CPU 数。
- filter_ch: 过滤包含 > n 个 CH 甲基化位点的 Reads。如果您不想启用此过滤器,请将 filter_ch 设置为 0。
Nextflow 快速开始(推荐)
如果您想批量处理样本并获得分析报告,请使用 Nextflow:
conda activate seeksoulmethyl
conda install -n seeksoulmethyl -c bioconda nextflow

# 准备样本表(见上例)
nextflow run SeekSoulMethyl/nf/main.nf \
  --outdir /path/to/results \
  --samplesheet samplelist.csv \
  -w /path/to/work \
  -c SeekSoulMethyl/nf/nextflow.config \
  -profile aliyun_k8s \
  --database_dir /path/to/reference \
  --split_fastq 4 \
  --filter_ch 2 \
  --chemistry DD-MET3 > methy.log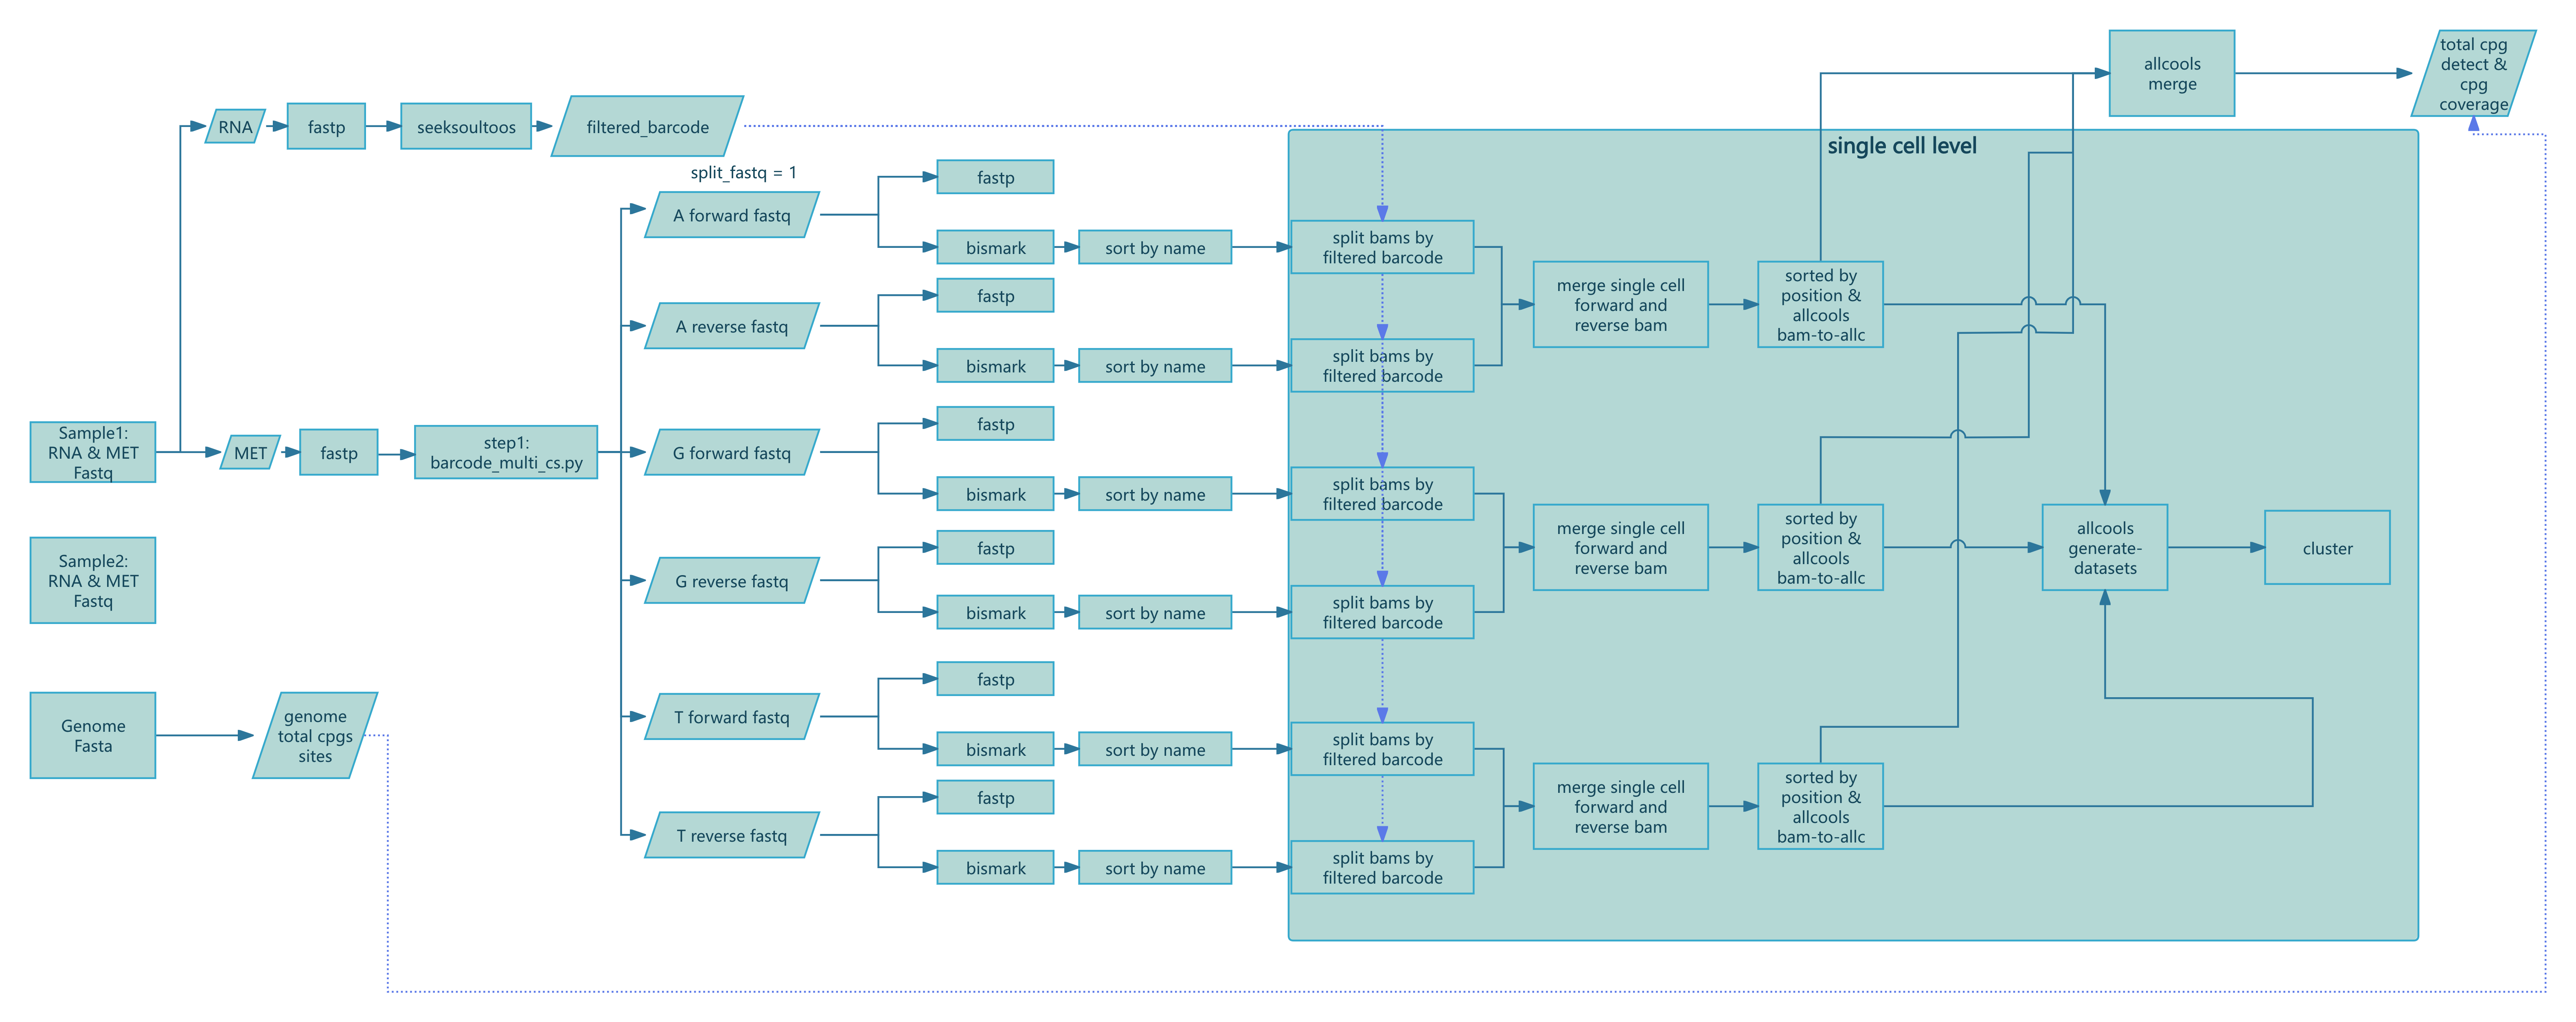
使用 Nextflow 运行
- 安装 nextflow:
conda install -n seeksoulmethyl -c bioconda nextflow- 准备您的输入样本表
cat > samplelist.csv << EOF
sample_id,expression_r1,expression_r2,methylation_r1,methylation_r2
XYRD-WTJW880,/path/to/XYRD-WTJW880-E_S1_L005_R1_001.fastq.gz,/path/to/XYRD-WTJW880-E_S1_L005_R2_001.fastq.gz,/path/to/XYRD-WTJW880-MET_S01_L001_R1_001.fastq.gz,/path/to/XYRD-WTJW880-MET_S01_L001_R2_001.fastq.gz
EOF

# expression_r1: 单细胞转录组 Read1 fastq 文件
# expression_r2: 单细胞转录组 Read2 fastq 文件
# methylation_r1: 单细胞甲基化 Read1 fastq 文件
# methylation_r2: 单细胞甲基化 Read2 fastq 文件
如果单个样本有多个数据集,且转录组和甲基化 FASTQ 数量不匹配(例如 WTJW969),请在样本表中添加多行,每一行代表一个数据集。
sample_id,expression_r1,expression_r2,methylation_r1,methylation_r2
WTJW969,/path/to/WTJW969_E_L003_R1.fq.gz,/path/to/WTJW969_E_L003_R2.fq.gz,/path/to/WTJW969_Met_L000_R1.fq.gz,/path/to/WTJW969_Met_L000_R2.fq.gz
WTJW969,/path/to/WTJW969_E_L004_R1.fq.gz,/path/to/WTJW969_E_L004_R2.fq.gz,/path/to/WTJW969_Met_L001_R1.fq.gz,/path/to/WTJW969_Met_L001_R2.fq.gz
WTJW969,,,/path/to/WTJW969_Met_L002_R1.fq.gz,/path/to/WTJW969_Met_L002_R2.fq.gz
WTJW969,,,/path/to/WTJW969_Met_L003_R1.fq.gz,/path/to/WTJW969_Met_L003_R2.fq.gz
WTJW969,,,/path/to/WTJW969_Met_L004_R1.fq.gz,/path/to/WTJW969_Met_L004_R2.fq.gz- 运行流程:
nextflow run -bg SeekSoulMethyl/nf/main.nf \
--outdir /path/to/tiny_demo/results/ \
--samplesheet samplelist.csv \
-w /path/to/tiny_demo/results/work \
-c SeekSoulMethyl/nf/nextflow.config \
-profile aliyun_k8s \
--database_dir /path/to/human-reference-GRCh38/ \
--split_fastq 1 \
--filter_ch 2 \
--chemistry DD-MET3 > methy.log

# --outdir: 结果输出目录
# --samplesheet: 样本表文件
# -w: nextflow 工作目录
# -c: nextflow 配置文件。必须根据您的服务器配置进行修改。
# -profile: 阿里云 k8s 的 nextflow profile
# --database_dir: 参考基因组目录
# --split_fastq: 为了加快分析过程,根据条形码的前 n 个碱基拆分 fastq。默认为 4。
# --filter_ch: 过滤包含 > 2 个 CH 甲基化位点的 reads。
# --chemistry: 甲基化化学体系(DD-MET3 或 DD-MET5)
关于 nextflow.config 的说明
nextflow.config 声明执行环境、资源配额和运行策略。您必须根据自己的服务器或集群进行自定义。
- 位置:
SeekSoulMethyl/nf/nextflow.config(运行时使用-c SeekSoulMethyl/nf/nextflow.config指定)。 - 需根据您的基础设施调整的关键项:
- 执行器:
process.executor(例如local,slurm,pbs,k8s,awsbatch)。 - 资源:
process.cpus,process.memory,process.time,或通过withLabel/withName进行细粒度覆盖。 - 工作目录:
workDir(也可以通过-w设置);确保其可写且有足够的空间。 - 环境:根据您的服务器支持情况,启用
conda.enabled、docker.enabled或singularity.enabled之一。
- 执行器:
示例配置(将路径和参数替换为您服务器上的有效值):
profiles {
  // 本地执行
  local {
    process.executor = 'local'
    workDir          = '/path/to/work'
    process.cpus     = 8
    process.memory   = '32 GB'
    conda.enabled    = true
    // 或者容器:singularity.enabled = true / docker.enabled = true
  }

  // Slurm 集群 (HPC)
  slurm {
    process.executor   = 'slurm'
    workDir            = '/lustre/work/your_user'
    process.cpus       = 8
    process.memory     = '32 GB'
    process.queue      = 'normal'
    process.clusterOptions = '-A your_account --qos=normal'

    withLabel: 'high_mem' {
      cpus   = 16
      memory = '64 GB'
    }
  }

  // Kubernetes (例如:阿里云 ACK)
  aliyun_k8s {
    process.executor   = 'k8s'
    workDir            = '/mnt/nf-work'    // persistent volume path
    k8s {
      namespace        = 'your-namespace'
      storageClaimName = 'your-pvc'
      cpu              = 4
      memory           = '16 GB'
    }
    // 如果全局使用容器镜像:docker.enabled = true
  }
}
提示:
- 选择与您的环境匹配的
-profile(例如slurm,local,aliyun_k8s),然后调整参数。 - 将
workDir保留在容量充足的快速存储上;最终结果目录由--outdir控制。 - 如果您使用 README 中的 conda 环境,首选
conda.enabled;如果您的集群偏好容器,请使用 Docker/Singularity。
参考资料:
- Nextflow 配置与 profiles:https://www.nextflow.io/docs/latest/config.html
- 执行器(local, Slurm, K8s 等):https://www.nextflow.io/docs/latest/executor.html
- Kubernetes 指南:https://www.nextflow.io/docs/latest/kubernetes.html
Nextflow 分步详解
本节描述每个 Nextflow 过程的输入、核心逻辑、关键参数和输出,以便于故障排除和解释。工作流定义在 nf/main.nf (script/SeekSoulMethyl/nf/main.nf:1) 中,过程在 nf/modules/*.nf 中实现。
步骤 1:预处理和条形码解析 (step1.nf)
计算全基因组 CpG 计数:
COMPUTE_CPG_SITES(script/SeekSoulMethyl/nf/modules/step1.nf:6)- 输入:
params.genomefa,params.chrom_size_path - 动作:运行
count_cg_sites.py计算 CpG 位点 - 输出:
genome_cg_info.json
- 输入:
转录组 FASTQ 质控(多组):
FASTP_EXPRESSION_MULTI(script/SeekSoulMethyl/nf/modules/step1.nf:22)- 输入:每个样本的成对 FASTQ(组 G1/G2/...)
- 动作:
fastp处理和质控 - 输出:处理后的
*_expression_clean_R1/2.fastq.gz,*.html,*.json
甲基化 FASTQ 质控(多组):
FASTP_METHYLATION_MULTI(script/SeekSoulMethyl/nf/modules/step1.nf:88)- 输入:每个样本的成对 FASTQ(组 G1/G2/...)
- 动作:
fastp质控(禁用接头检测,按流程修剪) - 输出:处理后的
*_methylation_clean_R1/2.fastq.gz,*.html,*.json
RNA 比对和定量:
SEEKSOULTOOLS_RNA(script/SeekSoulMethyl/nf/modules/step1.nf:156)- 输入:处理后的表达 R1/R2 列表
- 动作:
seeksoultools rna run(STAR 比对、计数、过滤、聚类、差异表达) - 输出:
Analysis/step3/filtered_feature_bc_matrix/等
甲基化条形码解析:
METHYLATION_BARCODE_EXTRACTION(script/SeekSoulMethyl/nf/modules/step1.nf:206)- 输入:处理的甲基化 R1/R2 列表,白名单
params.methy_barcode_wl - 动作:运行
barcode_cs_multi.py根据params.chemistry解析/校正细胞条形码和 UMI;可选--split_fastq n按前 n 个条形码碱基分片 reads - 输出:
step1/${sample}_forward_*{1,2}.fq.gz,step1/${sample}_reverse_*{1,2}.fq.gz,${sample}_methy_summary.json, 可选${sample}_barcode_stats.txt
- 输入:处理的甲基化 R1/R2 列表,白名单
构建正向/反向配对列表:
PARSE_FASTQ_FILES(script/SeekSoulMethyl/nf/modules/step1.nf:255)- 输入:正向/反向 FASTQ 集合
- 动作:扫描
step1/并按标识符配对文件 - 输出:
forward_pairs.txt,reverse_pairs.txt
条形码提取后质控:
FASTP_METHYLATION_BARCODE_EXTRACT(script/SeekSoulMethyl/nf/modules/step1.nf:368)- 输入:成对的 FASTQ
- 动作:
fastp质控 - 输出:每对
*.html,*.json
步骤 2:Bismark 比对和 BAM 排序 (step2.nf)
正向链比对:
BISMARK_ALIGNMENT_FORWARD(script/SeekSoulMethyl/nf/modules/step2.nf:3)- 关键参数:
--add_barcode,--add_umi; 最大插入片段大小-X 1000 - 输出:
*_bismark_bt2_pe.bam,*_bismark_bt2_PE_report.txt
- 关键参数:
反向(PBAT)比对:
BISMARK_ALIGNMENT_REVERSE(script/SeekSoulMethyl/nf/modules/step2.nf:31)- 关键参数:
--pbat,--add_barcode,--add_umi - 输出:同上
- 关键参数:
按 read 名称排序:
SORT_BAM_BY_NAME(script/SeekSoulMethyl/nf/modules/step2.nf:61)- 动作:
samtools sort -n - 输出:
*_sortbyname.bam
- 动作:
步骤 3:单细胞拆分、ALLC 生成/合并、数据集构建 (step3.nf)
按细胞条形码拆分 BAM:
SPLIT_BAM_FILES(script/SeekSoulMethyl/nf/modules/step3.nf:1)- 输入:按名称排序的 BAM 和 GEX 条形码
barcodes.tsv.gz - 动作:运行
step3_split_bams.py按细胞条形码拆分并仅保留共享细胞 - 输出:每个细胞的 BAM 目录,
*_filtered_barcode,*_filtered_barcode_reads_counts.csv
- 输入:按名称排序的 BAM 和 GEX 条形码
合并正向/反向单细胞 BAM 和计数:
MERGE_BISMARK_BAM(script/SeekSoulMethyl/nf/modules/step3.nf:27)- 动作:按匹配细胞
samtools merge -n;合并/去重条形码和 read 计数 - 输出:
*_merged_fr_bam/,*_merge_filtered_barcode,*_merge_filtered_barcode_reads_counts.csv
- 动作:按匹配细胞
生成单细胞 ALLC:
ALLCOOLS_BAM_TO_ALLC(script/SeekSoulMethyl/nf/modules/step3.nf:86)- 动作:运行
step3_bam_to_allc.py(自定义 ALLCools),基于 UR 的去重和甲基化定量 - 输出:每个细胞的
*_allc.gz和索引
- 动作:运行
合并细胞指标:
MERGE_FILTERED_BARCODE_READS_COUNTS(script/SeekSoulMethyl/nf/modules/step3.nf:114)- 动作:合并条形码和 read 计数,创建
${sample}_cells.csv和.json - 输出:
filtered_barcode,filtered_barcode_reads_counts.csv,${sample}_cells.{csv,json}
- 动作:合并条形码和 read 计数,创建
构建多尺度数据集:
ALLCOOLS_GENERATE_DATASETS(script/SeekSoulMethyl/nf/modules/step3.nf:136)- 动作:
allcools generate-dataset用于 chrom10k/20k/50k/100k/500k/1M,指标如count和hypo-score - 输出:
${sample}.mcds
- 动作:
合并 ALLC(分片时):
ALLCOOLS_SUBMERGE(script/SeekSoulMethyl/nf/modules/step3.nf:188),ALLCOOLS_MERGE(script/SeekSoulMethyl/nf/modules/step3.nf:223)- 动作:合并每个分片/每个样本的 ALLC
- 输出:
${sample}_merge_allc.gz和索引
提取 CG 前后的 ALLC:
ALLCOOLS_EXTRACT(script/SeekSoulMethyl/nf/modules/step3.nf:252)- 动作:
allcools extract-allc --mc_contexts CGN --strandness merge - 输出:
*.CGN-Merge*
- 动作:
(仅甲基化工作流 methy_only.nf 额外包含 COUNTS_MAPPED_READS 和 ESTIMATED_CELLS 用于基于 read 计数的细胞估计和条形码过滤,见 script/SeekSoulMethyl/nf/modules/utils.nf:1 和 :17)
步骤 4:汇总、降维和联合报告 (step4.nf)
甲基化汇总:
METHYLATION_SUMMARY(script/SeekSoulMethyl/nf/modules/step4.nf:2)- 动作:
step4_wgs_summary.py汇总 Bismark 报告、细胞指标和 CpG 统计数据,生成${sample}_methy_summary.json和${sample}_wgs_summary.csv
- 动作:
LSI/PCA 聚类和可视化:
METHYLATION_LSI_PCA_CLUSTERING(script/SeekSoulMethyl/nf/modules/step4.nf:26)- 动作:
step4_allcools_PCA_cluster.py --var_dim chrom20k --reduc lsi - 输出:
*.h5ad,*.pdf,*.png
- 动作:
转录组+甲基化联合报告:
MULTI_REPORT(script/SeekSoulMethyl/nf/modules/step4.nf:52)- 动作:
step4_report_rna_met.py整合转录组和甲基化报告输出 - 输出:
${sample}_rna_methyl_report.html,${sample}_rna_met.json
- 动作:
仅甲基化工作流(测试版,目前不建议使用)
当您只有甲基化 reads 时,使用简化工作流:
nextflow run SeekSoulMethyl/nf/methy_only.nf \
  --outdir /path/to/results \
  --samplesheet samplelist.csv \
  -w /path/to/work \
  -c SeekSoulMethyl/nf/nextflow.config \
  -profile aliyun_k8s \
  --database_dir /path/to/reference \
  --split_fastq 4 \
  --filter_ch 2 \
  --chemistry DD-MET3
关键参数和提示
--database_dir:参考基因组目录,包含fasta/genome.fa,genes/genes.gtf,star/,bed/chr_nochrM.bed(script/SeekSoulMethyl/nf/main.nf:19)--chemistry:DD-MET3或DD-MET5;同时也设置转录组试剂盒和条形码白名单 (script/SeekSoulMethyl/nf/main.nf:27)--split_fastq:按前 n 个条形码碱基分片(默认为 4;增加并行度但增加调度/合并开销)(script/SeekSoulMethyl/nf/main.nf:36)--filter_ch:过滤包含 > n 个 CH 甲基化位点的 reads(默认为 2)(script/SeekSoulMethyl/nf/modules/step1.nf:241)- 样本表表头必须是
sample_id(script/SeekSoulMethyl/nf/main.nf:116)
执行环境和资源
- 推荐容器镜像:
registry.cn-beijing.aliyuncs.com/seekgene/seeksoulmethyl:1.1.2(script/SeekSoulMethyl/nf/nextflow.config:69) - 选择
-profile aliyun_k8s或-profile docker,并请你编辑nf/nextflow.config - 关键步骤:Bismark/ALLCools 需要大量 CPU/RAM;默认值在
withName块中设置,如果需要请增加 (script/SeekSoulMethyl/nf/nextflow.config:313)
系统要求
如果使用 sc_methy_workflow.sh,系统要求如下:
- CPU:64 核(推荐)
- 内存:128GB RAM(推荐)
- 存储:至少 500GB 可用空间
- 操作系统:Linux(推荐 Ubuntu 18.04+ 或 CentOS 7+)
常见问题
- 样本表解析错误:确保第一列是
sample_id,并且使用绝对路径 (script/SeekSoulMethyl/nf/main.nf:111) - 缺少
${sample}.mcds:检查ALLCOOLS_BAM_TO_ALLC是否生成了单细胞*_allc.gz且chrom_size_path正确 - 卡在 Bismark:验证参考索引以及容器中是否可见
params.bismark_ref - 恢复运行:使用
-resume和相同的-w工作目录